Introduction to 3-Way Switch in a Guitar
Imagine this for a moment: You spot a vintage guitar at a local flea market. Its neck is a bit worn, but the body is unscathed, in a color that’s just your style. You cradle it in your hands, strum a cord, and capture the cool, clear sound echoing from the hollow body. Great! But then, you notice the switch – an essential little component that can either make your new find a music gem or a mere ornament. It’s a 3-way switch guitar, as I was quick to realize. Don’t stop reading now, because I’ve left out the most intriguing part. This is where it gets interesting!
Being an engineer with lifetime passion for lutherie, I knew the importance of a 3-way switch in guitar. So, I took it upon myself to understand how it worked, how to install it, and how to handle the occasional hiccups that come with it. I intend to share these invaluable experiences here, not just to satisfy your curiosity but also to enhance your guitar playing experience.
Spare me few minutes and I’ll change the way you perceive your guitar. I’ll guide you through the unseen part of your beloved instrument, connecting you to the heart of its electronics. Trust me, understanding guitar wiring and discovering the various guitar switches types is a fascinating journey. The 3-way switch, one of the essential guitar electronics components, is all about control over your instrument’s sound and character – and I will show you exactly how it does so.
Reflecting back on the day I stumbled upon that vintage guitar, it’s amazing to see how far I’ve come–from mere curiosity to sturdy expertise on 3-way switches in guitars. It wasn’t just about making an old piece playable again; I wanted to understand its personality, unlock its potential, and bring it to life. Now, I’m here to share the same experience with you. Are you ready? Dive in, savour the details, immerse yourself in the rich world of guitar electronics.
Why Installation of a 3-Way Switch is Important
When it comes to tweaking your guitar’s sound and performance, every small upgrade matters. A profound understanding of these seemingly minute components can make a world of difference. One such pivotal element in enhancing your guitar’s tone is the installation of a well-selected 3-way switch. This simple piece is essential when dealing with guitar pickup selector, as it enhances performance, and offers a wide range of pickup wiring options.
Think about this. Imagine all your guitar’s tonal possibilities limited because your 3-way switch is improperly installed. Do you want that to happen? Let’s find out why choosing and installing the right 3-way switch is critical for your guitar’s tonal potential.
In my research-oriented approach to instrument design, I’ve seen the significant impact a properly installed 3-way switch can make on a guitar’s pickup wiring. A guitar’s unique tone is tremendously influenced by this small, yet mighty piece of tech. Series/parallel pickup wiring, which is fundamental to your guitar’s diverse tonal structure, heavily relies on the impeccable installation of this switch. Consequently, it deeply influences the overall tonal character, which is a key factor for most guitar players.
From my experience, focusing on guitar wiring upgrades like installing a 3-way switch not just offers different tonal options, but also contributes to improving guitar tone by allowing seamless transitions between pickups. It ultimately broadens the range of sound you can produce, giving you the freedom to switch swiftly according to your musical demands. I’ve personally experimented with various options over the years, witnessing firsthand how this can significantly enhance your guitar’s performance.
Thus, I can confidently stress the importance of proper installation of a 3-way switch. It’s not just about connecting some wires, but understanding what each connection does, and how it can transform your sound. It’s about the power to shape your tone, to express your unique musical voice. So, let’s dive into the nuts and bolts of this crucial guitar upgrade and keep your guitar at its best, shall we?
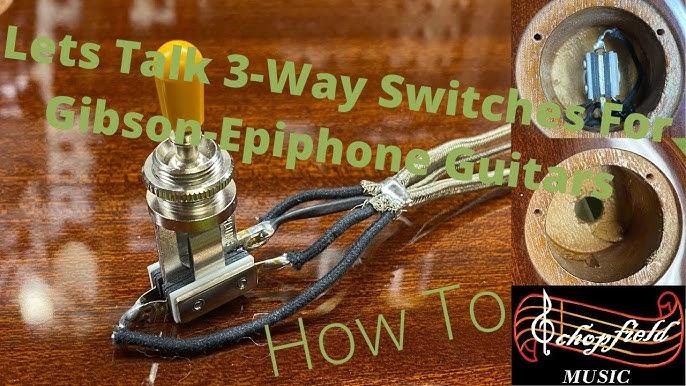
Installing a 3-Way Switch in Your Guitar
Selecting Your 3-Way Switch
Upon successful installation of the 3-way switch in your Gibson Les Paul guitar, the next critical task is its selection. Drawing from my years of experience and tested expertise, I can vouch for the importance of this step in influencing the overall performance of your guitar.
Selecting your 3-way switch isn’t a task to be taken lightly. As an avid user of Switchcraft components, I’ve come to understand that the switch quality can influence the resulting tonal options your guitar can produce. Consequently, a poor quality switch might restrict your guitar’s capabilities, while a high-quality one, such as a Switchcraft toggle, can greatly enrich your sound.
The perfect toggle switch encapsulates the spirit of your guitar, acting as the nexus between your musical ideas and their realisation through the guitar. Speaking from experience, the Gibson Les Paul toggle switch comes highly recommended due to its consistent performance, high durability, and the unique warmth it adds to my guitar’s sound.
However, the selection process extends beyond manufacturer brands. Additional factors to consider include the measure of the blade’s action, the smoothness of switch movement and of course, the switch must fit snugly within your guitar. For a replacement guitar switch, where your previous switch had already set a benchmark, the decision becomes even more critical.
In conclusion, as someone who’s navigated these challenges numerous times, my advice is simple: choose a switch that reflects your guitar’s character and fulfills your musical aspirations. As facile as it may sound, there’s no ‘one-size-fits-all’ solution. Every guitar has its unique personality; let the 3-way switch you choose contribute richly to that uniqueness.
Moving forward, it may seem intricate, but with a logical wiring diagram and some patience, you can successfully install your chosen switch. Let’s delve into using a wiring diagram, the next crucial step in this enactment.
Using a Wiring Diagram
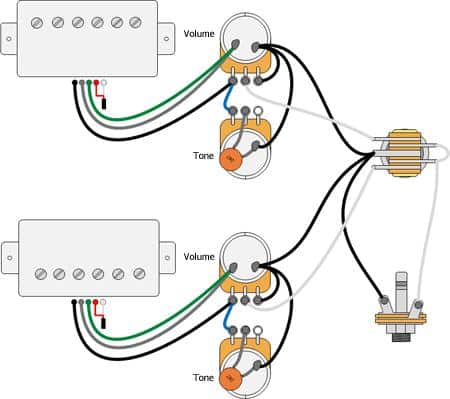
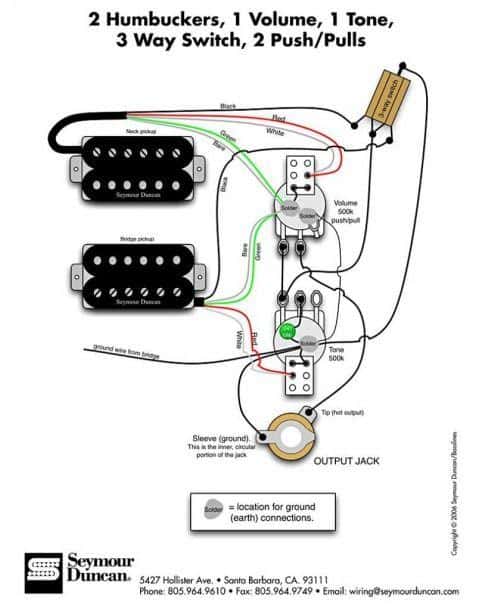
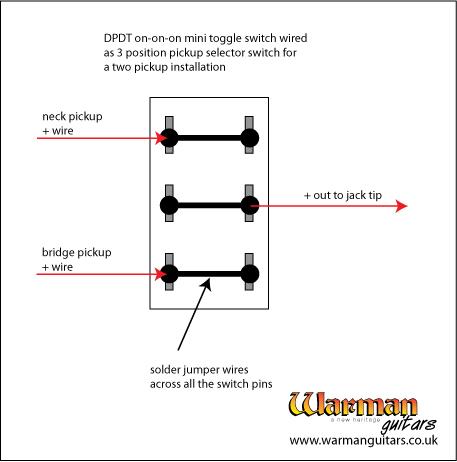
Stepping deeper into the installation process, utilizing a 3-way switch guitar wiring diagram is pivotal to ensure error-free and efficient work. My engineering stint has ingrained the worth of a schematic representation in me, simplifying the complexities of a project. So, let’s venture into how this supplementary tool can streamline the installation of our 3-way switch.
The primary function of the guitar wiring diagram is to virtually exhibit the electrical connections that are to be physically crafted. It’s like the architecture of a building that visualizes the blueprint of crafting the final product. The wiring diagram aids in comprehending the complexity of wiring circuits, highlighting their hierarchical structure, which otherwise might be arduous to digest. Thus, an accurate wiring diagram is key in configuring your guitar wiring kit properly.
Unpacking the intricacies of wiring configurations can be often overwhelming, especially when dealing with a plethora of wires. A vividly drafted wiring diagram can make this task simpler by demonstrating the path of signal flow, color-coding for wire distinction, and critical points of soldering. This indicates not just what connects to what, but also how they interrelate, eliminating guesswork and potential errors.
What’s more, a wiring diagram provides that extra level of preparedness. It helps in pre-planning your wiring strategy, making it easier to manage the internal space of your guitar, eliminating clumsy clusters of wires. Having a sound plan enables smoother workflow, reduced chances of miswirings or short circuits, and ends up contributing to a smarter, neater, and higher-performing 3-way guitar switch setup.
To conclude this section, a wiring diagram proves to be a concise, visual illustrative guide, indispensable for implementing a 3-way switch flawlessly. It’s like a roadmap, pointing us in the right direction and helping us navigate complex circuits with confidence and ease. It’s not just an aid; it’s a must-have should we aim for precision and perfection while installing a 3-way switch in the guitar.
Following the application of a 3-way switch guitar wiring diagram, let’s embark on the actual installation process, to morph ‘the diagram’ into ‘the reality’.
Step-By-Step Installation Process
With a solid understanding of why a 3-way switch is essential to your guitar setup and having selected a suitable switch, let’s dive into the step-by-step process on how you can install it. As someone who has spent years specializing in guitar modding and repair, I assure you this process is easier than you think, yet the contribution to your guitar performance is profound.
First, make sure you’ve unplugged your guitar and loosen the strings enough to remove the pickguard smoothly. Be cautious not to damage the electric guitar electronics during this step. Patience is key!
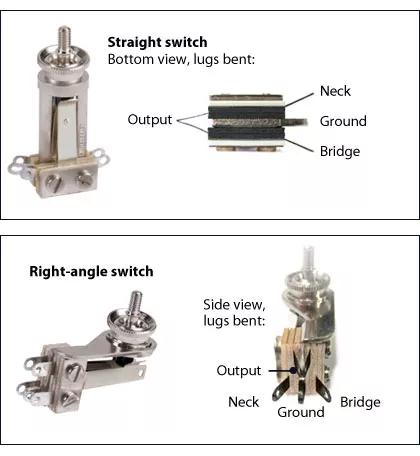
Next, remove the old switch. You’ll need a soldering iron to detach the wires from it. Remember to note which wires go where, as you will connect the new switch in the same manner.
Then, it’s time to install the 3-way switch. Secure it to the pickguard first, then use a soldering iron to connect the wires back up. Refer to the previous step or your wiring diagram to ensure the connections are correct. Time and again, my experience in guitar repair has taught me the importance of verifying each step, especially when handling guitar modifications.
Lastly, once your switch is in place and the wires are attached, re-install the pickguard and tighten the guitar strings back up. Give it a test to see if all settings are functioning as required.
In essence, a successful 3-way switch installation largely depends on maintaining the health of your guitar’s electrical components, earnest attention to detail, and a sound understanding of guitar modding. So, you’ve got your 3-way switch installed, but what if it doesn’t work as expected? Stay with us, as our next section will walk you through the art of troubleshooting common issues you might encounter with a 3-way guitar switch. I encourage you to consider this process as part of the journey in making your guitar truly yours. Happy modding!
Troubleshooting Issues with 3-Way Switch
Recall those moments when the tingling excitement of a guitar performance was abruptly cut short by devious issues with the 3-way switch, causing an avalanche of frustration that nearly sent you into a frenzy? You might think that there’s some dark magic afoot but, in actuality, the culprit is perhaps as mundane as a pickup wiring glitch or selector switch trouble. Fear not, for I’ll guide you down the winding paths of troubleshooting, sprinkling wisdom from my years of guitar acoustics exploration and countless hours hunched over tangled wires.
Have you ever felt the frustration of a guitar issue derailing a practice or performance? If your answer is a resounding ‘yes’, then you are not alone. As a veteran strummer, I’ve wrestled with a broad spectrum of electrical anomalies, transforming hair-pulling torment into triumphant triumph. Join me as I take you on a journey to unveil the underlying mysteries and share simple yet powerful solutions to these common, but vexing issues.
Step right into the realm of diagnosis: the first stop is pickup wiring troubleshooting. A faulty pickup wiring can wreak havoc on your sound output, but thankfully, it’s often a relatively straightforward fix. Verify the wiring diagram and confirm that all connections between the set of three switches and the corresponding volume pots are correctly aligned. A potent mix of vigilance and a soldering iron can blaze through this problem.
Picture this: you’re in the midst of a scintillating solo, and you reach to flip the selector switch to produce that haunting bridge pickup tone, but alas, no soul-stirring sound ensues. The issue? Likely a faulty switch or poor contact between the switch and the pickup circuit. An informative way to root confirm this is by setting the amp at a low volume, then gently tapping on the pickups with a metallic object. If the sound mirrors the taps when the switch is flipped, then voila – a clear indication of a selector switch issue.
Navigating towards the surface of your guitar, guitarists often overlook one chief antagonist – guitar toggle switch caps. It may seem insignificant, but a loose or broken switch cap can create mysterious malfunctions in the 3-way switch. Regularly verify the physical condition of these caps, ensuring they’re tightly secured, and free from cracks or wear. Pro tip: keep some spare caps handy as they wear off with time and frequent use.
Sitting in the heart of a coil-splitting guitar, the coil tap switch is another key component that could create chaos. For instance, failure of this switch might limit your tone options, suppressing the divine squawk of your single coil tone. Review the coil wire connections and ensure they’re firmly soldered to the switch. Also, inspect the wiring for any breaks or loose connections.
Working through these potential hurdles with patience and attention can be immensely rewarding – the sweet sound of victory as your trusty guitar bounces back to life is truly exhilarating. I’ve experienced this triumphant satisfaction countless times, and my goal is to empower you with the tools and knowledge to conquer the beast of 3-way switch problems yourselves.
Remember, there’s no disgrace in being stumped by these glitches – every seasoned guitarist has walked down this path at some point. The key is to approach each one with a healthy dose of curiosity and a ready soldering iron. Embark on this troubleshoot adventure, and emerge a guitar wiring conqueror, turning distortions into melodies and breakdowns into breakthroughs.
FAQs
What is a 3-Way Switch in a Guitar?
How do I install a 3-Way Switch in my Guitar?
What Should I Do If I Encounter Issues After Installing a 3-Way Switch in my Guitar?
Conclusion
Did you have any idea about how deep the world of guitar electronics is? As we wrap up, let’s look back at the journey we’ve taken and the sound-enhancing potential a 3-way switch brings to your guitar.
In this guide, we not only touched upon the realm of understanding guitar wiring but delved into the specifics of a 3-way switch guitar implementation. From discussing the importance of installing a 3-way switch to meticulously outlining the step-by-step installation process, we explored the many facets of custom guitar wiring, emphasizing its indispensable role in achieving tonal perfection.
We also resisted shying away from potential pitfalls, dedicating a substantial section to troubleshooting issues one might encounter with a 3-way switch. The ‘FAQs’ section, I trust, addressed many of your pressing questions, further clarifying this complex subject. Ultimately, our mission was to equip you with a holistic understanding of this essential element of guitar modding, and the knowledge necessary to confidently install and troubleshoot a 3-way switch in your instrument.
As I close this guide, I hope my experiences and knowledge in lutherie have shed light on the marvels of 3-way switch guitar wiring. Guitar crafting and modding is a lifelong journey that I’ve been privileged to embark upon, and I’m eager to share the ride with you.
Whether you’re a novice peeking into the mechanics of your cherished instrument or a seasoned luthier craving a deeper understanding of guitar electronics, remember that mastering 3-way switch wiring is a key milestone on this journey. May your endeavor to tweak and refine your guitar’s performance be a triumphant success. Go forth and craft your unique sound with confidence and knowledge!