Do you know that feeling of strumming a Rickenbacker guitar? The richness of its tone, the characteristic jangle that has echoed through rock ‘n’ roll history, it’s just incomparable. There was something about that tone that captivated me, and it helped set me on a journey of discovery. From my first encounter with a Rickenbacker guitar kit, my view on guitar assembly shifted remarkably. But how exactly that happened, well, that’s a story I will unfold as we proceed.
As a long-time afficianado of DIY projects, I’ve assembled a variety of stringed instruments, each teaching me the tangible value of every component in defining the final sound. Among them all, Rick style guitars have always held a special place in my heart. Delving into the world of Rickenbacker guitar assembly, its simplicity and uniqueness has been a revelation. However, I’ve learned the hard way that assembling your own guitar or bass does not always come without its trials.
This guide is born from those trials. Whether you’re a seasoned luthier looking for a fresh challenge or a novice eager to get your hands on your first DIY guitar kit, you’ll find valuable insights here to enrich your experience. Together, we’ll journey through the various components of Rickenbacker style guitar kits, understand what makes them unique, and explore the avenues to tailor them to your preference. So, are you ready to embark on this journey? Let’s rock and roll!
Understanding Rickenbacker Guitar and Bass Kits
Components of the Kit
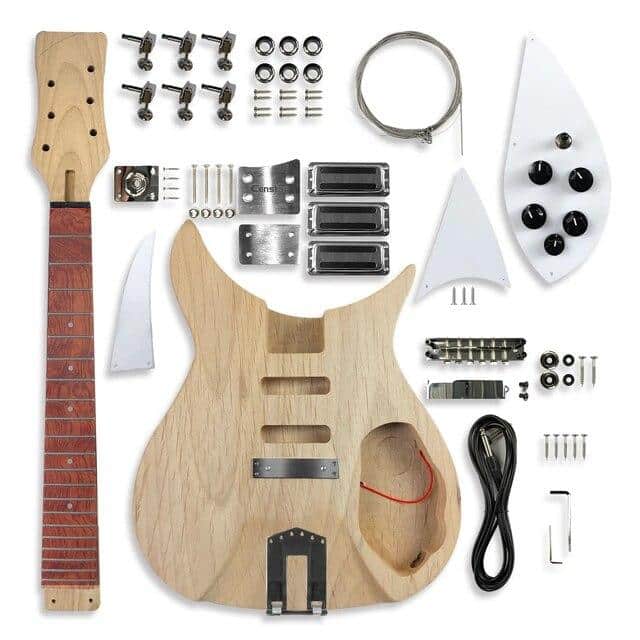
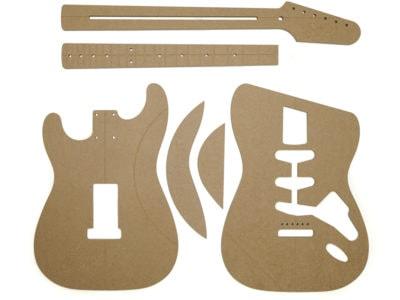
Diving deeper into our exploration of Rickenbacker guitar and bass kits, we can’t overlook the quintessential role of the various components that build these masterpieces. The components are not just pieces of wood and metal. They are the soulful elements that shape the timbre, resonance and overall character of your instrument. As someone who’s assembled a Rickenbacker bass kit or a semi-hollow guitar kit, I can vouch for the satisfaction of putting together a instrument from scratch, making every small detail count.
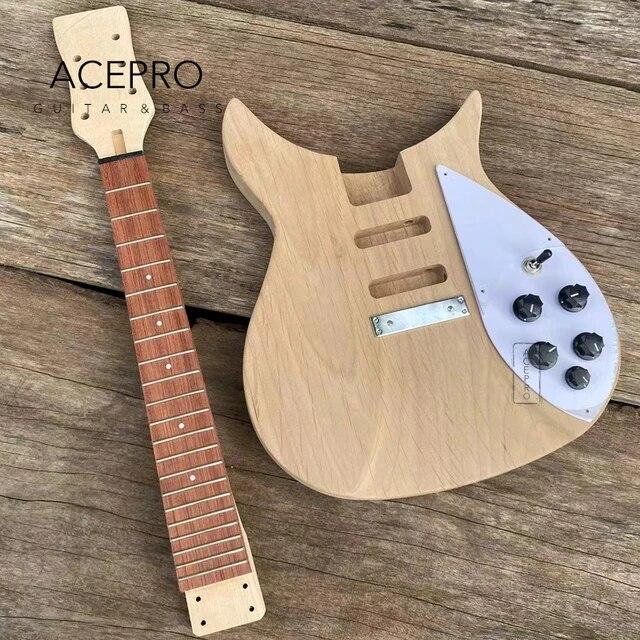
Understanding the guitar kit components is crucial. It involves the body, neck, fretboard, hardware like tuning machines, bridge, pickup, and finally the electronic components like potentiometers and switches that contribute to the distinctive Rickenbacker sound. With each component, I like to analyze its contribution to the final sound and playability. Whether it’s selecting the right tonewood for body and neck, choosing hardware components, or assembling the electronics, each decision affects the sound of your instrument, giving it a unique voice and aesthetic appeal.
Yet, while these components are critical, their assembly is equally essential as it is from this process that the unique beauty of a Rickenbacker takes shape. Therefore, I ensure each component is meticulously crafted and fitted together perfectly. It’s this level of focus and precision that makes building a Rickenbacker a uniquely rewarding journey.
After immersing ourselves in these individual components and their roles, we’re in an ideal position to deep-dive into different Rickenbacker style kits, each offering their unique flair and tonal characteristics. This learning journey is much like assembling a Rickenbacker: each part of the process brings us closer to the final masterpiece, reflecting our personal touch and choice.
Overview of Different Rickenbacker Style Kits
Having spent considerable time delving into the spectrum of Rick style guitars, I’ve noticed each style carries its unique allure and melodic exuberance, each contributing its distinct flavor to the broader category of Rickenbacker Guitar and Bass Kits.
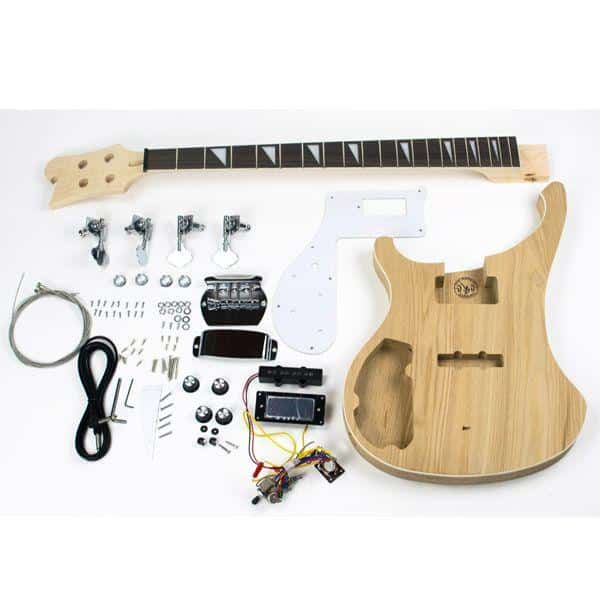
The Rickenbacker bass kit stands out with its traditional design and sonorous, rich sound. Arguably, one of the most recognizable bass lines in the classic rock genre emerges from a Rickenbacker bass, its unmistakable tone is loved by many musicians, from Lemmy Kilmister to Paul McCartney. Meticulously crafted to reflect the original design’s authenticity, this kit allows DIY enthusiasts to piece together their very own version of this iconic bass.
On the other hand, exploring the nuances of the Semi-hollow guitar kit presents an entirely unique experience. Renowned for its warm, resonant tones, this kit appeals to musicians who are drawn to its distinct vintage vibe. Intricate in design and challenging in its assembly, the semi-hollow Rick kit calls to those passionate about luthiery, delivering not just an instrument at the end, but the fulfilling experience of creating it.
Weaving these two kit types into the broader category is a testament to Rickenbacker’s musical versatility and heritage, each offering distinct acoustic profiles for the discerning musician. As we advance in this guide, remember that each unique kit adds a chapter to your musical journey, as we unravel together the art and joy of creating your own Rickenbacker instrument.
Assembling Your Rickenbacker Guitar or Bass
The Luthiery Process
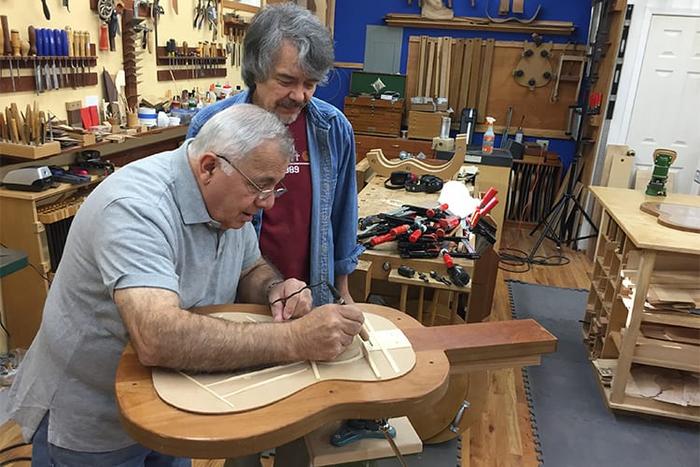
If you’re immersing yourself in the task of assembling your own Rickenbacker guitar or bass, you’re already journeying through the fascinating world of luthiery. This artistry and craft lends itself beautifully to DIY guitar building, allowing you to delve deeper in a tangible and hands-on way into the world of stringed instrument construction.
My personal experience in this field has shaped my understanding of luthiery, granting me detailed insights. I’ve learnt that every step of the build process requires meticulous attention to detail and the utmost patience – this extends from the preparation of the guitar body to stringing and final setup.
So, how exactly does luthiery fit into building your own Rickenbacker? Well, in the realm of luthiery, nothing is arbitrary. Consider the wood chosen for your guitar’s body – this isn’t simply an aesthetic choice. The type of timber influences the resonance and tonal qualities of your instrument. The neck and fretboard too, demand careful selection and proper installation as they significantly influence playability.
Such careful considerations define luthiery and are essential when you build your own guitar. The process of piecing together your Rickenbacker isn’t just about connecting components; it’s a journey of tailoring an instrument to your preferences, regarding both sound and feel. This engaging process inevitably instills a deeper sense of connection to your instrument.
Undeniably, sharpening your understanding of luthiery will enhance your DIY kit assembling adventure. From shaping the fret ends to adjusting the truss rod for correct neck relief, every little detail matters. Moreover, taking some extra time to understand the tonal differences among various woods, or experimenting with the placement of your pickups can steer you towards creating a unique instrument that truly speaks your musical language.
The knowledge and insights garnered from the realm of luthiery can truly elevate the experience of building your own mighty Rickenbacker. So, as you prepare to dive into this rewarding journey of assembling your Rickenbacker guitar or bass, remember: you’re not just a builder, but a luthier in your own right. And as we transition into the next critical phase of our DIY voyage – wiring your guitar or bass – hold on to this perspective.
Wiring the Guitar or Bass
Having delved into the assembly process and hard craftsmanship of building our guitars or basses, we now approach a crucial phase – the wiring. My engineering background sparked a deep fascination in me for this particular aspect of guitar crafting. I trust you’ll find it as intriguing. Following our comprehensive guitar wiring guide, we will breathe life into these instruments, making the tones we adore possible.
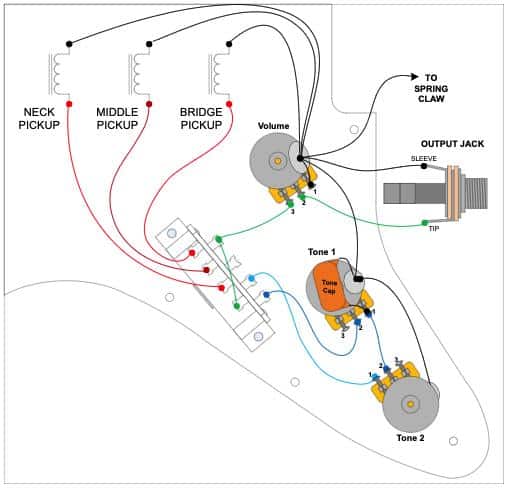
Wiring your guitar or bass is an intricate task where each wire and solder joint is crucial to the sound quality of your instrument. In simpler terms, the pickups, switches, and knobs linked through our wiring will shape our guitar’s voice. This step will be an enlightening experience if you’ve decided to build your own guitar.
The beauty of Rickenbacker kits lies in their thoughtful design. Every component comes ready to be seamlessly attached and wired. The wiring might look complex at first, but with patience and adherence to the guide, it becomes a gratifying task. Ensure you strictly follow the wiring diagram and use the right soldering techniques; this aids in reducing any noise that a poorly soldered joint might bring with it.
When correctly wired, you achieve the bass’s iconic growl or the sparking treble of the guitar, each note rolling off beautifully. The logical assembly and precise wiring of Rickenbacker kits contribute significantly to this result. Precise wiring guarantees no loss of tone or volume, allowing the guitar or bass to sing out in its full capacity.
Remember, any deviation from the specified connections could result in hum or buzz, detracting from the sound quality. This process, though time-consuming, is integral to our goal of creating an instrument that not only looks good but sounds incredible too. A well built and wired Rickenbacker replica is a testament to your skill as a luthier.
As we wrap up with wiring, our musical tool is nearly ready to strum or pluck. We’ve invested hours, passion, and meticulous effort into each piece of timber, each wire, each soldering, and it’s nearly time to reap the rewards. Our journey, however, is not over yet. As we move on to the next section, ‘Customizing Your Guitar Kit,’ we’ll add our personal touch to the instrument, ensuring it doesn’t just sound right, but also looks the part.
Customizing Your Guitar Kit

As a passionate guitar craftsman, I often wear a thrilling sense of anticipation when I pop open a new Rickenbacker guitar kit. It’s not just about assembling an instrument; it’s a fantastic opportunity to add your personal touch, transforming it into an extension of your character, vision, and sound.
Remember: Guitar kit customization is not just a mechanical process, but a creative journey. More than once, I have stood back, guitar in hand, and realised – this was no longer just a piece of wood and wires. It was a reflection of my unique aesthetic, my sense of music, and my tenacity in making this dream a reality. Which brings me to a vital point – why do you need to customize your own guitar?
What if your guitar was more than just a musical instrument? What if it could be a reflection of your true self, echoing your unique vision and sound? Let’s explore the fascinating realm of custom guitar building. You start off with a Rickenbacker guitar kit, but what you end up with is so much more. As you carve the instrument body to your liking, select the components that fit your ideal sound, you’re shaping a part of your identity.
The liberty of creating a guitar that truly echoes your unique sound is exhilarating. My various customization projects have been a testament to this endless world of creativity. From warping neck profiles for that cozy grip, experimenting with different pickups for that distinctive tonal quality, to getting hands-on with woodworking and varnishing for a more personalized touch, every decision is a step closer to making that instrument your own.
Custom guitar building is an incredible opportunity to put your soul into an instrument, making it an embodiment of who you are as a musician. It becomes an instrument tuned not just to musical notes, but also to your creative instincts.
Remember, each modification you make impacts the tonal quality, playability, and aesthetics of your guitar. So study your options, plan meticulously but also, don’t hesitate to experiment. At the end of the day, you’re in control of your instrument’s destiny – shaping it, molding it, making it a melodic mirror to your soul.
In the upcoming chapters, we’ll delve deeper into understanding the unique components of your kit, the luthiery process, wiring, and choosing the right supplies to breathe life into your Rickenbacker guitar or bass. See this as your opportunity to create – not just a guitar – but a revered extension of your musical self.
Choosing the Right Supplies
As we delve into the crucial aspect of choosing the right supplies for your DIY guitar kit, I’m reminded of my early days as a luthier. The process is far more nuanced than one might initially believe. It’s not merely a matter of selecting tools and materials. Rather, this decision plays a pivotal role in the final tone, feel, and appearance of your Rickenbacker guitar or bass.
Understanding the role each tool and material will play in the process is key. My years of experience have taught me this. And it’s not just the larger, more obvious components such as the body, neck, and strings that matter. The smaller purchases – the finish, the kind of sandpaper you use, the polish – are equally impactful. Each choice you make will ultimately reflect in your finished musical instrument.
Quality is another essential thing to consider. Purchasing guitar kit supplies of substandard quality might save you money initially, but the end result could be compromised. I’ve witnessed this in my own guitar builds in the past. Always remember, an investment in quality supplies now is an investment in your guitar’s future performance.
To illustrate, let’s consider the wood. The timber wielded for guitar building significantly influences both aesthetic and acoustic properties of the guitar. My personal preference has always leaned towards dense and hard woods, such as Maple, for their tonal clarity and resonance.
The type of glue is another critical choice. Opting for hide glue, for instance, can give you a bond that is much stronger than the wood itself. But working with hide glue can be tricky, given its rapid dry time. It’s these details that can make all the difference in your DIY guitar kit project.
At the end of the day, the supplies you choose tell a story about the instrument you are crafting. They reflect your vision, your attention to detail, your commitment to creating something extraordinary. So, invest the time in choosing your supplies wisely. Experiment and don’t shy away from a learning curve. I promise, the satisfaction of playing a Rickenbacker guitar that you’ve personally crafted, touched by each of your choices, is truly unparalleled… There’s a beauty in this journey, from raw materials to a soulful instrument that resonates with your own voice.
As we continue our deep dive into the world of Rickenbacker guitar and bass kits, let’s move forward with some of my top picks in the market, followed by a practical guide to their assembly. But remember, always take time to choose your supplies with care, for they are the very foundation of your musical masterpiece.
Review of the Best Rickenbacker Guitar and Bass Kits
As we steer our fascinating deep dive through the world of Rickenbacker guitar and bass DIY kits, we arrive at a critical juncture, which I’m immensely thrilled about – the section on reviewing the best kits currently available on the market.
As a seasoned luthier with countless guitar building projects under my belt, I’ve had the opportunity to put a multitude of kits to the test. My interaction with these kits transcends beyond the outlook of a simple hobbyist, giving me an insight you’d hardly find elsewhere. So, let’s cut to the chase and delve right into it.
Looking for the perfect Rickenbacker guitar or bass kit for your DIY project? Well, fret not. I’ve done the hard work for you. Let’s venture together into the details to discover the exceptional kits that stand head and shoulders above the rest. Beyond mere statistics, I’ll share my personal experiences, which I believe would be an invaluable addition to your knowledge base.
Firstly, let me make an important distinction clear. When comparing the sets, it’s noteworthy that every kit has a unique charm of its own. Some shine through their impressive fidelity to vintage Rickenbacker designs, while others captivate with their customization potential. However, emphasis on certain essential factors such as build quality, ease of assembly, and included components objectively separates the wheat from the chaff.
Of all the kits I’ve tested, the Rickenbacker 360 12-string electric guitar DIY kit has persistently proven to be a cut above the rest. The precise craftsmanship, the impeccable quality of wood, and the undeniably accurate, old-school aesthetics make it a delight for any ambitious guitar builder. The characteristic resonance and soulful sound quality of the completed product remind me of why I fell in love with the Rickenbacker sound in the first place.
For bass enthusiasts, the crown undoubtedly goes to the Rickenbacker 4003-style bass guitar kit. This kit allows you to create a bass powerhouse that not only has an incredible look but also generates that weighty ‘Rick’ sound. The meticulous design and ease of assembly make it an ideal choice for both beginners and seasoned builders alike.
Moving on, the Rickenbacker 330-style 6 string electric guitar kit is my top recommendation for those who prefer their electric guitars with a touch of vintage appeal. This kit encapsulates the classic shape, the inviting warmth, and the dominant sound that makes Rickenbacker guitars a choice of rock legends.
While selecting a kit, remember to focus on your individual requirements and preferences. Each Rickenbacker kit is a beautiful canvas for you to express your unique luthiery skills and creativity – whether you want to recreate the vintage vibe or carve an entirely new identity.
Whether it’s the design, build quality, comprehensiveness of components, or the overall satisfaction of the project, I have left no stone unturned in reviewing these kits for you. I sincerely hope that this guitar kit review will serve as a handy guide on your journey to crafting your dream Rickenbacker masterpiece.
As we plunge into the next section, which will deal with the nitty-gritty of the luthiery process, keep these insights in mind. We’ve got a lot more ground to cover, and I can’t wait to continue this thrilling journey with you down the enchanting path of the Rickenbacker guitars and basses.
FAQs
What are Rickenbacker DIY Kits?
Why should I consider a Rickenbacker DIY Kit?
What is included in a standard Rickenbacker DIY Kit?
Do Rickenbacker DIY Kits require any additional tooling?
Are there any skills or knowledge prerequisites for assembling a Rickenbacker DIY Kit?
Conclusion
So, why embark on this adventure of creating your own Rickenbacker instrument? It’s more than just a DIY guitar kit or a fresh guitar building project. It’s a journey, a deep dive into the heart of music itself, transforming raw materials into a harmonious instrument that’s tailored to resonate uniquely with you.
What would it mean to you to play an instrument that you’ve crafted with your own hands? The sense of accomplishment, the sheer joy of creation, and the intimate connection forged with every strum – these are the bountiful rewards awaiting at the end of your guitar-building journey. Crafting my own Rickenbacker has been a source of immense personal satisfaction. Every instrument I’ve built carries a piece of my passion, my story. And I’m living proof that you, too, can experience the same.
From understanding the components, navigating the luthiery process, wiring, and customizing your kit, to choosing the right supplies, this guide has offered you a comprehensive insight into the exciting world of Rickenbacker guitar and bass kits. Armed with this knowledge, you’re now ready to create a musical masterpiece that’s a unique reflection of you. Turn the page and let your Rickenbacker journey begin!