The moment sounds silencier than silence, the stage more vacant than ever. Holding my beloved acoustic in my hands, I realize the horrifying reality: the bridge has given way. Thousands in the audience are oblivious to my secret ordeal. I recount the incident not to induce your sympathy, but to reassure you that such nightmares can be turned into mere hiccups if you master the art of acoustic guitar bridge replacement.
As a seasoned instrument designer and luthier, my lifelong rendezvous with strings has empowered me with insights on handling such daunting tasks. Over the decades, I’ve unravelled that the task isn’t as formidable as it seems, and my expertise in repairing acoustic guitar bridges has saved many performances from potential disaster.
You might ask, why must one bother learning this skill when professional repair services are so readily available? Stick with me, I promise you’ll get your answer – and by the end of this guide, you might just discover a newfound sense of confidence in handling your beloved six-stringed comrade.
Understanding the Importance of Guitar Bridge

Moving forward in our comprehensive session on all things guitar bridges, it’s important to hone in on the singular concept that, in my many years as a luthier and an ardent contributor to the American Lutherie journal, has always stood the test of time and experience— the crucial importance of the guitar bridge.
I can tell you, unequivocally, that few parts of your acoustic guitar play as drastic a role in influencing its sound and playability as does the bridge. Maintenance of this critical component should never be an afterthought. So, why is this humble piece so integral in the grand scheme of acoustic guitar maintenance?
Did you know that the bridge plays a pivotal role in your guitar’s voice and playability?
Let me unpack this for you. A guitar’s bridge has the primary responsibility of holding the strings in place, yes, but that’s not all. Each string rests on a saddle, a small piece usually made of bone or synthetic material, which is part of the bridge. Why is this important? It’s because the saddle directly impacts the way your instrument vibrates. A correctly set up bridge ensures that the string vibrations are effectively transmitted to the top wood of your guitar. This energy transfer directly influences the timbre and the volume of your guitar, which is why proper guitar setup bridge repair is essential.
However, it’s not just the instrument’s sound that’s affected. The bridge also plays a vital role in the playability of your guitar. It helps determine the action of the strings, i.e., the distance between the strings and the fretboard. This distance significantly affects your ability to play the guitar comfortably.
In my articles on guitar maintenance, and particularly bridge repair, I often stress the significance of matching the bridge material to the guitar’s wood. Different materials have varied resonance characteristics, affecting the overall tonality and resonance of the guitar. Hence, while replacing the bridge, understanding the compatibility between these materials is crucial.
In my career as a luthier, I’ve seen and rectified numerous instances of misaligned, overly worn, or improperly installed bridges. All these issues not only compromise the sound but also cause physical discomfort while playing. Therefore, it’s vitally important to remember – regardless of whether you’re just tuning up your guitar or doing a complete overhaul, always give the bridge the attention and care it warrants.
As we proceed further in our discussion on replacing the bridge on an acoustic guitar, keep these key insights at the forefront. Understanding the essential role of the bridge will enable you to make well-informed decisions during your guitar maintenance journey.
Potential Problems and Solutions
Identifying the Issue
Having covered the significance of the guitar bridge and glimpsed into potential issues and remedies, we’ll now delve into the ‘nitty-gritty’ aspect of identifying a problem with your guitar bridge. In my years of experience, I’ve found that the most common bridge issues revolve around a loose or lifting guitar bridge.
Indeed, harking back to my engineering days, discerning the symptoms of a loose guitar bridge was among the most valuable skills I acquired. It is an art that goes beyond superficial observation, and I’m excited to share this knowledge with you.
Essentially, a loose guitar bridge looks like it’s pulling away from the guitar’s body. You might notice a gap between the bridge and the top of the guitar, or the bridge may even appear slanted. If the bridge is lifting, the guitar’s action (a term referring to the distance between the strings and the fretboard) will likely be unusually high, making the guitar more difficult to play.
These symptoms indicate an immediate need for attention, as negligence could lead to more extensive, expensive damage. Your guitar’s sound, playability, and longevity greatly hinge on a functioning bridge.
This initial problem identification paves the way for us to discuss viable solutions. It’s of crucial importance to nail the issue first before diving into the fix in the next sections; it will save both your time and effort. Understanding the issue accurately forms the basis for choosing an appropriate solution, be it a professional repair, DIY fix, or bridge replacement.
Choosing a Solution

Choosing the most efficient way to fix your guitar bridge can be tricky. Back in my early luthier days, I had to rely on DIY guitar bridge repair due to the scarcity of professional services. Drawing from these experiences, I understand the value in selecting the most appropriate solution. This is your moment of choice: opting for a professional guitar luthier bridge replacement or daring an at-home modification.
Keep in mind, both options have their merits. DIY repair allows self-paced learning and hands-on experience, aiding in familiarizing oneself with the instrument. Conversely, professional services offer expertise and precision, albeit at a higher cost. A key consideration should be the severity of damage and your experience level. Moderate to minor issues may be addressed by DIY solutions, while severe and complex problems warrant professional attention.
My advice? Weigh your options rationally. If you’re a passionate guitarist with time and interest in learning repair techniques, give DIY a try. However, seeking professional help not only ensures a quality fix but also enables you to observe and learn from an expert’s hand. Remember, a conscientious balance between mastery and help is the keystone to good musicianship.
Coming up, we’ll delve deeper into DIY guitar bridge repair, walking you through the process, enhancing your understanding, and refining your luthier skills. If you choose a luthier’s help, the subsequent sections will still prove informative: knowing the process helps communicate effectively with your repair technician and ensures quality work. Let’s forge ahead confidently, whether you’re holding a chisel or merely observing.
DIY Guitar Bridge Repair
Removing the Old Bridge
Moving onto the DIY guitar bridge repair, it’s time to begin removing the old bridge, an undertaking that can initially seem intimidating. Much like the first time I faced this task, I remember the stress of worrying about damaging my acoustic guitar. Over time, though, I learned it’s a task that can be accomplished with the right technique and tools.
Getting the job done starts by heating the bridge to loosen the glue. I advise using a specially designed heating blanket if available. However, a clothes iron with a thin fabric guard also suffices. Remember, the goal is to soften the glue, not to scorch or damage the guitar.
Proceed gently using a palette knife to empathetically ease the bridge from its place. Inexperience and hurried actions risk harming the guitar’s top. The significance of removing the acoustic guitar bridge can’t be overstressed; it marks the first major step in addressing the issue at hand.
Once the bridge is removed, thoroughly clean any old adhesive from the site. It’s essential at this stage to ensure you have a clean and even base for the new bridge.
The challenge of removing the old bridge is met with patience and precision, traits that not only translate to successful guitar repair but also deepen your connection with the instrument.
Applying the Glue

Having aptly removed the old bridge, it’s time to apply the glue, a pivotal step when performing a DIY guitar bridge repair, and one that requires keen attention to detail. Learning the right way to do this was part of my initiation as a luthier.
Crucially, the glue for the guitar bridge must be of high quality. It’s this adhesive that holds the bridge to the guitar body long term, which directly impacts the sound and playability. Using inferior glue jeopardizes the whole repair.
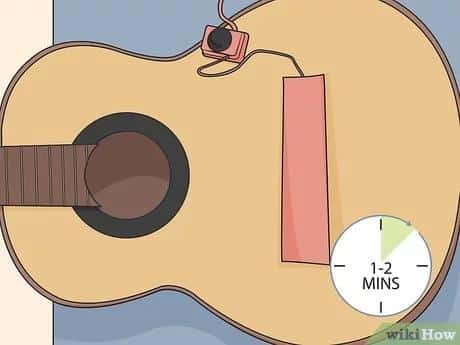
Once the glue is ready, apply a light, even spread over the bridge, paying close attention to cover the entire surface area. Excessive use can cause messy spills, while too little leaves weak areas. Giving it a short while to set before further steps helps the adhesive fully bond.
Performing this step correctly may seem minor, but let me assure you, its significance cannot be overstated. A well-bonded guitar bridge is integral to the instrument’s sound and longevity. In the next section, we’ll discuss how to carefully install the new bridge; remember, patience is the luthier’s greatest ally.
Installing the New Bridge

Having expertly applied the glue, we are now in position to experience the satisfaction and pride that comes from doing the actual work of installing a guitar bridge. Remember, it’s all about patience and precision.
The process of installing the bridge is a delicate task, requiring not just technical knowledge, but also an intimate understanding of your instrument. You have to ensure that the position of your new bridge aligns perfectly with the inherent quirks and characteristics of your particular guitar. This is where your journey into DIY guitar bridge repair really pays off.
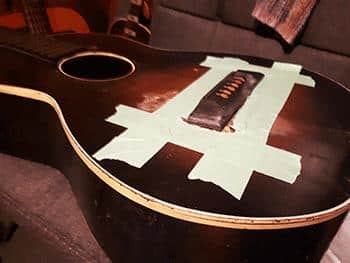
Once you have positioned the bridge, it’s crucial to exercise meticulous care as you clamp it down. Use a caul on the inside to ensure that pressure is evenly distributed throughout the bridge. After all, it’s these little details that make all the difference between a good job and a great job. A tribute to the symbiosis between man and music.
Remember, there is no rush. Give the glue ample time to dry; it’s better to wait an extra day than to risk an unstable bridge. And whenever in doubt, don’t hesitate to experiment. You may just discover a better way of doing things, further solidifying your DIY skills.
By the time you’re done installing the guitar bridge, you’ve practically become one with your instrument. With each pluck of the strings, you’re not just creating music, you’re creating a bond. This is the true beauty of DIY guitar bridge repair; it’s a journey that extends far beyond the simple act of manipulation or adjustment.
With the bridge now in place, we’re nearing the end of our DIY guitar bridge repair journey. The next step will involve tweaking and maintenance to ensure everything is in perfect harmony.
Professional Repair Services

As someone who has spent a considerable part of his career collaborating with an array of luthiers, I’ve come to appreciate the profound skills and precision involved in guitar bridge replacement. A seasoned luthier brings a depth of knowledge and experience, mixed with a personal touch, that simply can’t be replaced by a novice, no matter how detailed a guide may be. The process becomes not just a repair, but an art in itself.
Now, if you’re thinking, ‘Can you get professional help to replace your guitar bridge without breaking your bank?’ the answer is a resounding yes. It all comes down to doing your homework in finding the right luthier who offers not just affordability but quality service, and that’s where my experience comes handy.
When selecting a professional repair service, consider their track record in the guitar luthier bridge replacement field. Ask about the luthier’s experience, approach, methodology, and tools in replacing a guitar bridge. It’s important to find a luthier who professionally can handle your instrument, respects your budget, and understands the sentimental value of your guitar. When you come across a luthier who ticks all these boxes, you’ve struck gold indeed.
The cost to replace a guitar bridge will vary largely depending on the complexity of the job, the model of your guitar, and the luthier’s experience. Don’t let the cost be the primary decision-making factor. Remember, quality work comes at a price and is an investment in the longevity of your guitar.
My journey through the guitar bridge replacement process, right from identifying issues through to post-replacement maintenance, has helped me discover, appreciate, and respect the expertise of luthiers. Trust me when I say, finding a good professional repair service can make all the difference in your guitar’s performance. Net-net, don’t hesitate to seek professional help when required.
To wrap it up, while replacing the bridge on your guitar may seem like a daunting task at first, having the right people by your side can effectively simplify the process. Onward then, to focusing on maintenance and saddle adjustment, to ensure a seamless playing experience post-replacement.
Maintenance and Saddle Adjustment
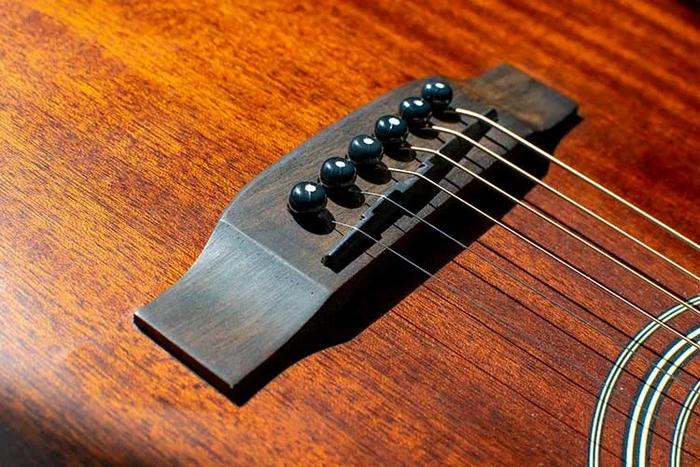
As we move from replacing the guitar’s bridge, there is another area we can’t afford to overlook—the saddle. Remember, the saddle isn’t just another piece of your guitar anatomy; it’s the unit carrying the primary responsibility of balancing the string tension, ensuring your sound stays crisp and alive. The perennial relationship between maintaining a guitar and keeping up with its saddle adjustment is a theme that must not be overlooked, whether you’re an established luthier or a beginner. As part of my expansive knowledge pool and experience, I can attest to the critical influence this junction wields in determining the guitar’s sonic signature.
Over the years, it’s common to encounter changes in action and playability—owing much of which to the saddle and bridge plate’s status. A neglected saddle might cause your guitar to lose its shine and crispness, leading to unwanted buzz and inconsistent voicing. Hence, understanding saddle adjustment on guitar is just as crucial, if not more, as any other part of your instrument.
Here’s a secret—regular guitar maintenance is easier than you think, and could save you a fortune. Instead of having to replace your bridge frequently due to poor maintenance, slight yet regular adjustments to your guitar’s saddle can prolong its longevity. A well-adjusted saddle enables consistent tension across the strings, ensuring that each note sings as intended, rather than being dampened or skewed.
With my knowledge from my experience in the field coupled with my engineering background, I can say without hesitation that saddle adjustment is a fine art. It’s a balance between getting the right tension and preserving the bridge plate’s health. If the saddle is too high, it affects playability, while a very low saddle risks damaging the bridge plate, necessitating a bridge plate repair.
While it’s necessary to tweak around with millimeter adjustments, the goal should always be to ensure the set action does not put undue stress on the bridge plate. If you stay mindful of this delicate balance, you could save yourself from costly repairs or replacements in the future—of course, this is only one part of a more extensive guitar bridge fixing guide I’ve spent years crafting and refining.
After revisiting the topic on the saddle adjustment, I hope it would encourage you to prioritize maintenance post-repair. It’s important to note that a perfectly replaced bridge can still encounter problems if the saddle adjustments are not up to par. Therefore, be diligent about ensuring the saddle is always in optimal condition – it could mean the difference between a musical masterpiece and a costly, avoidable repair job.
As we wrap up this section, let’s gear up to delve into common queries guitarists often have, spanning from broad to intricate ones. Stay tuned as we unpack these in the forthcoming FAQs section. You’ll also find my dedicated efforts in making this entire journey more accessible and apply them directly to your own experience—assuring you make the most out of your beloved instrument.
FAQs
What is a Bridge on an Acoustic Guitar?
When do I need to replace the bridge on my acoustic guitar?
How do I replace the bridge on an acoustic guitar?
What materials do I need to replace the bridge on my acoustic guitar?
Conclusion
In conclusion, the significance of this guide is anchored in redefining your scope of understanding and expertise on various aspects of guitar maintenance, primarily the replacement of the guitar bridge. Undertaking a DIY guitar bridge repair task not only enhances your bond with the instrument but also proves beneficial in terms of the cost to replace guitar bridge which can be significantly higher when seeking professional help.
Ready to become a guitar maintenance pro? Your journey starts here! With the knowledge and experiences I’ve amassed over my years as a guitar enthusiast, I’ve aimed to make this guide a comprehensive manual for players of all levels. Whether you’re still learning the ropes or are a veteran strummer, an understanding of the bridge and the role it plays in the sound and efficiency of your guitar is indispensable.
I trust that this guide has endowed you with the vital skills and insights needed to keep your acoustic guitar on top form, maintaining that rich sound quality that makes every strum a delight. Remember, understanding your instrument and knowing how to maintain it is the real secret of achieving and preserving its optimal performance. Here’s to many melodious moments ahead!