As a luthier and former engineer who has ventured into the realm of guitar customization, a life-altering moment occurred the day the concept of a ‘blood splatter guitar finish’ walked into my workshop. To say I was enthralled would be an understatement; here stood a nexus of artistic expression and personal aesthetic signature that immediately captivated my imagination. However, before we delve into that transformative chapter, I feel compelled to reveal that the path to this intriguing manifestation of guitar visual aesthetics is as accessible as it is stunning.
Having dabbled in all forms of guitar finishes, I discovered that this rebellious and striking style has rapidly gained popularity, yet it remains shrouded in mystery for most hobbyists and even experienced customizers. But, rather than a convoluted maze, realizing this unique amalgamation of art, rebellion, and rock essence is a journey of expression and engineering precision within reach of anyone willing to embrace it.
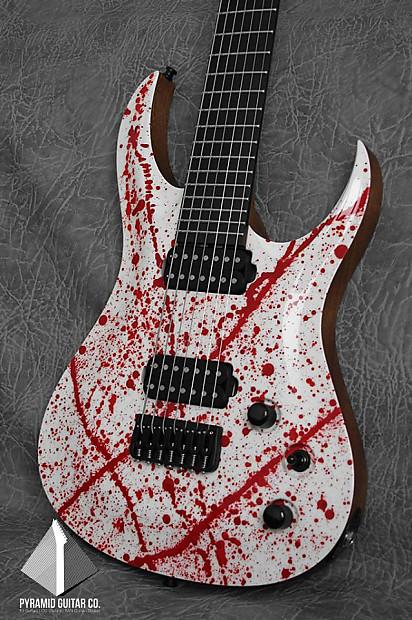
Indeed, this is no ordinary customization. The blood splatter guitar finish is a physical testament to the impassioned roar of rock ‘n’ roll, an iconic manifestation of intensity transforming into raw beauty. It’s not just a decoration – it’s like the guitar’s own battle scars, an emblem of defiance and passion.
What if I told you that you could make your guitar ooze character while elevating its visual aesthetic to an eye-stopping spectacle? Deep within this article, I’ve infused decades of experience and a profound understanding of guitar finishes to guide you towards that very aspiration. This is not just about painting your guitar; it’s about equipping it with a captivating visual narrative.
Join me as I unravel this exhilaratingly visceral approach to guitar personalization, walking you through every step of creating your own blood splatter guitar finish. Let’s start this thrilling journey together, steeped in authenticity and ready to breathe new life into your beloved instrument.
Creating Blood Splatter Effect on Guitars
Materials and Preparation
When creating a blood splatter effect on your beloved guitar, materials and preparation are everything. This isn’t just about aesthetics, it’s also about maintaining sound quality, so wrong materials and unprepared surfaces can be detrimental. For DIY guitar paint jobs, you’ll need three things primarily: the base coat color of your choice, the splatter paint color(notably red for blood), and a clear coat to seal it all in.
The base coat provides the backdrop for the splatter. While deciding on colors, remember subtle contrasts yield the most effective results. For your ‘blood’, acrylic paint remains my recommended pick. It offers a consistency perfect for creating realistic smatterings of fake blood on guitars.
The best thing about these materials? They’re readily available. However, preparation is also a key player here. The guitar surface needs to be carefully cleaned with a mild detergent solution, lightly sanded, and thoroughly dried before getting started.
Moving on, let’s uncover the intricacies of the painting process, where the real magic happens, shall enthralling you with insights on how to wield your brush to create that coveted blood-splattered masterpiece.
The Painting Process

In my journey on creating a blood splatter effect on guitars, the painting process is where things start to come alive. Creativity and control balance on a tightrope and your guitar is the canvas.
As we transition from preparation to painting, first ensure your workspace is well-ventilated. Safety is key. Paint comprises volatile substances which are harmful when inhaled excessively. Consider using a protective mask as your health is paramount.
Choosing the right paint is vital. When it comes to creating the red paint splatter guitar, I recommend a high-quality, quick-drying acrylic paint. The shade of red depends on your individual preference. My choice usually tilts towards a darker, more ‘bloody’ spectrum of red to emulate an authentic splatter effect.
The process begins with an entirely black, primed guitar. With a stiff bristle brush dipped in red paint, hold it above the surface and tap it using another tool such as a stick. This forces the bristles to flick and hence, splatter paint across your guitar. The key is to maintain balance – don’t go overboard, yet ensure enough coverage for a realistic blood splatter effect. Remember, each guitar is unique and the splatter pattern contributes to its character.
The painting process is definitely trial and error at its core. My many experiments over the years have taught me patience. Don’t hesitate to let it dry and start over if you’re not satisfied for an authentically eerie artifact of your musical artistry.
Moving forward in our blood splatter guitar journey, proper finishing techniques and a defined aesthetic vision will refine and solidify your custom design. Stay tuned to learn more in our upcoming sections. Remember, patience and practice make perfect.
Finishing off
As a seasoned guitar craftsman, I have come to understand the critical role ‘finishing off’ plays in creating blood splatter effects on guitars. The final clear coat is not just about sealing off the artwork beneath but vital for longevity and visual appeal.
Applying a clear coat to the painted guitar is the culminating stage where the beauty gets locked in, cannily enhancing the blood splatter effect. From my experience, the application should be light and even. Remember, the clear coat also plays its role in reflecting light off your guitar, giving the blood splatter depth and realism.
Information from years of guitar construction has taught me the subtle art of applying the clear coat. If done right, it does not just offer physical protection to the paint underneath but also contributes to your design’s aesthetics.
As you transition into the latter part of applying your blood splatter finish, bear in mind that this part is as critical as the moment you first dipped your brush into red paint. Sealing your masterpiece properly ensures your guitar looks stunning every time it catches the stage light.
Inspiring Blood Splatter Guitar Designs

Throughout my career, I’ve encountered some truly inspirational guitar designs: some born out of years of iterative work and polish, others materializing out of happy accidents, the whimsical serendipity of creativity at play. Each of these designs over the years has laid the groundwork for how we see and use the aesthetic vocabulary of the instrument, building a rich tapestry of visual look and feel that matches the power of the music guitars create. I cannot overstate the sheer magnificence and thrill of being swept away by these designs. They impart an undying surge of imagination that I’m eager to share with you to spark creativity for your own guitar customization.
What if I told you that some of the most iconic guitar designs are actually accidents turned into inspirations? One of those oddly fulfilling accidents was the ESP Eclipse blood splatter design. Developed in Tokyo, the ESP designs are hailed as trailblazers in the music industry, and for a good reason. The Eclipse’s unique blood splatter design emerged as an outcome of a paint experiment gone right – unplanned but so visually striking that it carved its niche in the guitar design iconography. One look at it, and you’re reminded of the raw, energizing pulsations of rock music, hurtling into a blizzard of emotions.
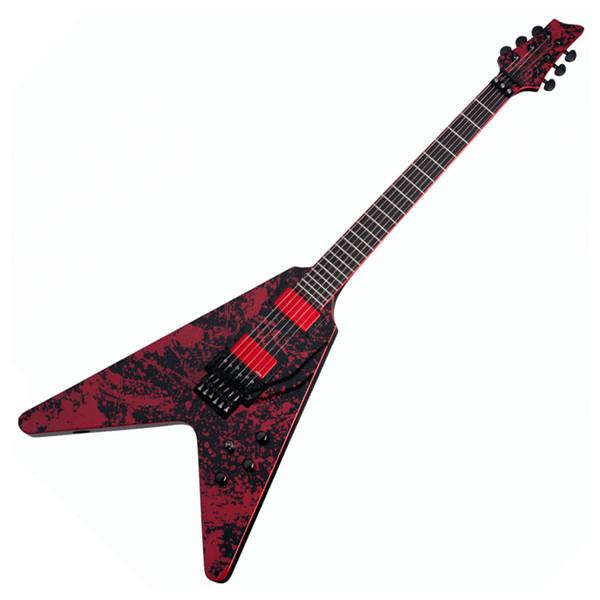
Just as the Eclipse carried the banner of serendipitous design, another guitar model carved its identity in this realm: the Michael Amott Tyrant X Splatter guitar. Celebrated for its skull and blood splatter design, Amott’s signature instrument is an avatar for the aggressive, visceral spirit embodied by metal music. It was as though each melodic note that sprung from the guitar had a visual counterpart, streaked in red and black on its body.
Then there’s the Gary Holt signature guitar, which epitomizes blood splatter designs with an approach that borders on artistry. Holt, the thrash metal guitar pioneer, led Exodus and played in Slayer. His signature guitar’s design reflects his passion for blood splatter art and resonates deeply with the genre’s inherent dynamism. What makes this guitar stand out is not just the boldness of its design, but its unapologetic embrace of edging onto the macabre, and, in doing so, becoming a symbol of defiance against convention.
To say that these designs inspire would be a gross understatement. They redefine the way we perceive the intersection of music, art, and personal expression. They convey the unspoken, the intangible, the spirit that ignites when fingers strum the strings, and the echoes fill not just the space around but also seep into the crevices of our being. These designs are their own unique language, a silent but powerful partner in the creation of unforgettable music.
As you venture onto your journey of guitar customization, I urge you to let your imagination run wild, taking cues from these and endless other designs that have made a mark through their fearless expression.
The Role of Guitar Customization in Rock and Metal
Unique Aesthetics in Guitar Design
As we delve deeper into the realm of guitar customization in rock and metal music, the distinctive role of unique aesthetics in guitar design begins to unfold. It’s not just about how a guitar sounds, but how it looks – a point of view I’ve further cultivated as a longstanding writer for lutherie publications.
Guitar visual aesthetics carry an intrinsic value that resonates with the musician and the audience. The design elements, the colors, and even the custom guitar wraps can become integral to the musician’s identity, reflecting their style, personality, and musical journey. This fusion of audio and visual expressions amplifies the bond between the artist and the instrument.
The significance of this relationship is intensified in genres like rock and metal, where expressive amplification and moody aesthetics are pivotal. A blood splatter guitar finish may seem graphic but carries an essence of raw energy and rebellion, so inherent to these music styles.
Much like the power of a memorable riff or an emotive solo, an unforgettable guitar design leaves an impression that lingers long after the last note has faded. The uniqueness of guitar aesthetics, hence, is not just a peripheral addition but an integral part of creating a holistic musical performance.
With this understanding, let’s explore some unforgettable blood splatter designs that have graced the stage, and the way these powerful visuals forge an immersive connection with the audience. But first, a closer look at the intricate process of creating these designs is in order.
FAQs
What is the Blood Splatter Guitar finish?
How can I create a Blood Splatter Guitar finish at home?
What items do I need to get started with this DIY project?
Do I need experience in painting to do this DIY project?
Conclusion
As we round out this foray into guitar customization, I can’t help but think back to my own journey – the exhilarating path from engineer to luthier. Each stage of the process, from the initial sanding to the final, rich blood splatter guitar finish, transformed the humble instrument into a reflection of my identity. This journey isn’t just about the end outcome. It’s about the process itself, the artistry you pour into every detail.
By putting your own spin on your guitar’s design, you’re not just creating an instrument, but a piece of art. Are you ready to take the plunge?
Just as each blood splatter guitar finish is unique, so too is every guitarist’s connection to their instrument. Guitar customization isn’t a one-size-fits-all process. My hope is that this DIY guide kindles your creativity, inspiring you to craft an instrument that mirrors your unique style, something quintessentially you.
Guitar customization is a journey fraught with challenges, surprises, and, in the end, a tremendous sense of achievement. Every step, from gathering your materials to applying that final coat of lacquer, is an opportunity to immerse yourself in the creation process and produce something seriously special.
In closing, I offer this humble perspective – guitar customization, much like the music we create with these remarkable instruments, is a deeply personal endeavor. And the most rewarding part? You’ll have an art piece that not only sounds amazing but truly represents who you are as an artist.