Have you ever wondered why a seemingly minor tool like the guitar bridge clamp can be a game-changer in DIY guitar repair? Picture this: you’re a budding luthier, guitar in hand, ready to restore its melodic beauty. Suddenly, you’re faced with a bridge lifting issue, and your once-loved instrument is on the brink of being unplayable. This is where the humble yet mighty guitar bridge clamp steps in, an unsung hero in the world of guitar maintenance.
As someone who has spent decades in lutherie, I’ve seen firsthand how crucial proper guitar maintenance is in preserving the instrument’s longevity. Yet, many overlook the significance of bridge clamps. In this guide, we’ll delve into why this tool is indispensable, uncover the mysteries behind its effectiveness, and empower you to perform repairs with confidence. Let’s embark on this journey to make guitar repair not just easy but truly transformative.
What are Guitar Bridge Clamps?
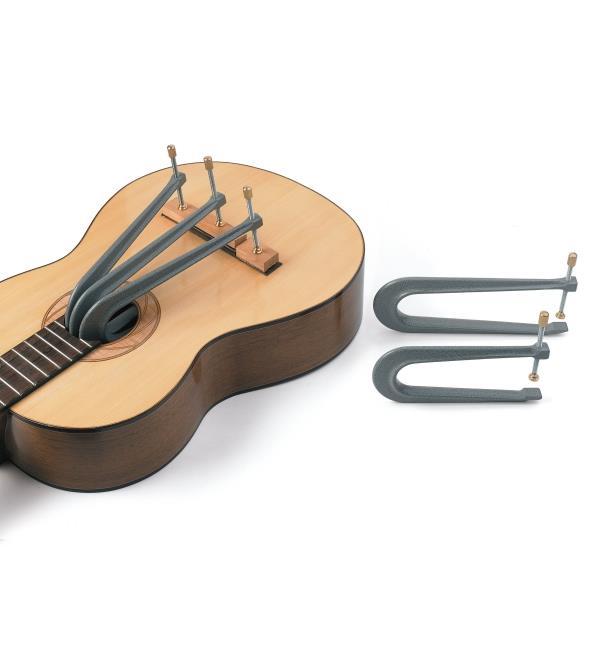
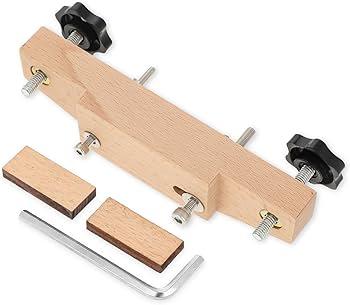
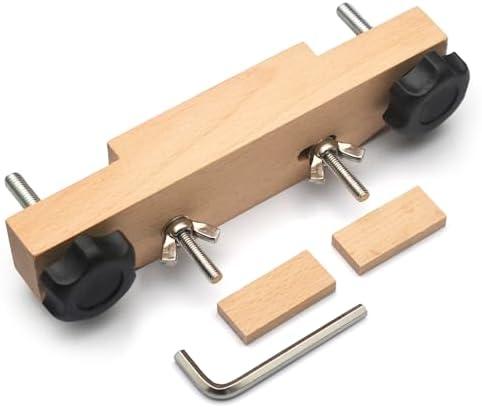
Throughout my journey in instrument design, I’ve witnessed the transformative effect of using the right tools. What if I told you that the right clamp could mean the difference between a successful repair and a costly repair failure? This is where guitar bridge clamps come into play, a critical component in the world of luthier supplies. These specialized clamps are designed to hold the bridge of a guitar firmly in place while the adhesive sets during repairs or construction.
Understanding the various types of guitar clamps is essential for any repair enthusiast or seasoned professional. From my experience, guitars are as varied as the musicians who pick them up, and so are the clamps required for their maintenance. Each type of clamp, whether it’s a cam clamp, a hand screw, or a bridge clamp, serves a unique function and offers distinct advantages. The selection of the right tool must be informed by factors like the type of guitar, the kinds of materials used, and the specific repair task at hand.
Guitar bridge clamps provide the precision and stability necessary for maintaining the integrity of the instrument’s structure. Using the right clamp enhances the longevity and quality of the repair, ensuring that the guitar sings with the clarity and resonance originally intended. As we delve deeper into this topic, it’s important to appreciate the importance of being well-versed in selecting and utilizing these invaluable tools, drawing from both expertise and hands-on experience.
Why Use a Guitar Bridge Clamp?
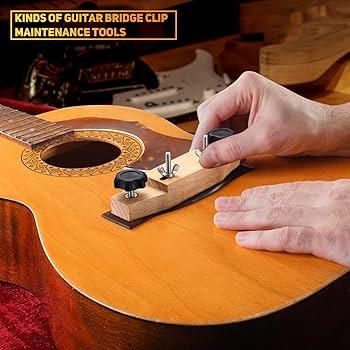
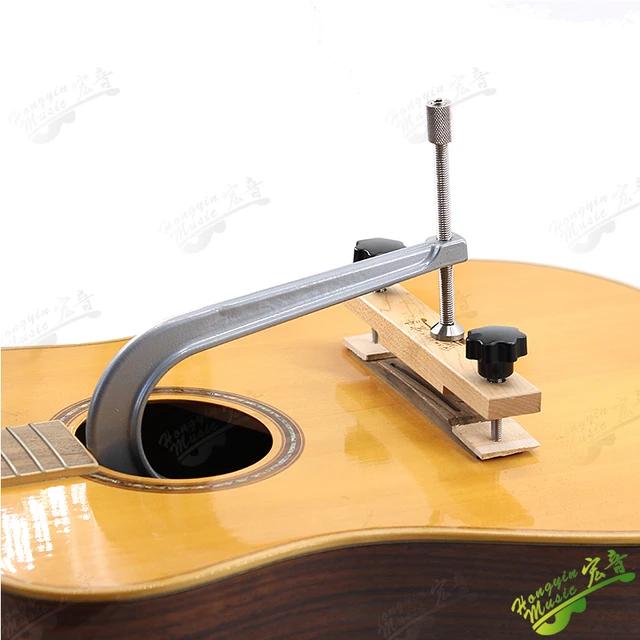
Imagine trying to glue a delicate structure without the right support – that’s what repairing a guitar bridge is like without a clamp. Every time I embark on an acoustic guitar bridge repair, the thought of assembling such a critical part without the aid of a bridge clamp seems almost unfathomable. The precision required in guitar bridge gluing is immense; even the slightest misalignment can lead to uneven pressure and a weak bond. This is where the indispensable utility of bridge clamps becomes apparent.
In my own work, I’ve often relied on clamps for repairs, and their ability to create an evenly distributed pressure is invaluable. It’s not just about holding things in place; it’s about ensuring that every bit of the glue sets with the correct tension, offering a reliable and enduring fix. This precision is crucial for both the functionality and sound quality of the instrument. Without it, the success of your repair could be compromised, causing you to revisit the repair far sooner than you’d like.
From my experience, using a guitar bridge clamp is not merely a tool but a vital companion in achieving a thorough and professional repair. It’s this combination of technical necessity and practical application that makes the bridge clamp an absolute must-have in repairing guitar bridges. As we navigate this guide further, we’ll explore who can benefit the most from these tools and the intricacies involved in selecting the right one for your needs.
Who Should Use Guitar Bridge Clamps?
Are you a DIY enthusiast looking to elevate your guitar repair skills? The right tools can make all the difference! As someone who’s spent years tinkering and perfecting the art of guitar maintenance, I can confidently say that *guitar bridge clamps* are indispensable for anyone wanting to ensure their instrument’s structural integrity. Whether you’re just starting out or have been at it for a while, these tools can significantly enhance your repair work.
From my personal *guitar luthier tips*, I’ve observed that bridge clamps are not just for seasoned professionals. They’re essential for hobbyists curious about delving deeper into the mechanics of guitar repair. Using a clamp correctly allows you to expertly address issues like loose or detached bridges, ensuring your guitar sounds as harmonious as it should. *DIY guitar bridge clamp* projects could well be your gateway to a more profound understanding and enjoyment of your craft.
By integrating bridge clamps into your toolkit, you’re not only refining your work but also gaining a *valuable skill* that enhances both the sound quality and longevity of your guitar. With a little practice and the right approach, anyone keen on guitar care will find bridge clamps an invaluable ally in their DIY repair journey.
When to Use Guitar Bridge Clamps?
Timing your clamp application can be as crucial as choosing the right glue – have you been doing it right? This is a question I’ve pondered countless times while working on guitar maintenance in my cozy workshop. In the intricate dance of guitar repair, timing is everything. Whether you’re tackling a loose bridge or installing a new one, understanding the *optimal moment* to employ your bridge clamps can be the difference between a satisfactory repair and a frustrating series of setbacks.
Over the years, I’ve learned that the perfect time to use those trusty guitar bridge clamps is right after *ensuring your surfaces are impeccably prepared* and your adhesive applies seamlessly. *Clamping techniques for guitar bridges* demand precision; hesitate too long, and you risk the adhesive starting to cure unevenly. Clamp too soon, and you might find your bridge isn’t perfectly aligned. I imagine it’s much like hitting the perfect note — you know it when you feel it.
The subtle art of knowing when to apply pressure with guitar bridge clamps often comes down to experience and intuition. For novices, I always suggest *practicing with scrap materials*, understanding how temperature and humidity might affect your setting time, and never rushing the process. Embrace the learning curve, as it colors all your repairs with the unmistakable brushstrokes of personal growth in the field of lutherie.
How to Choose the Best Guitar Bridge Clamp
What’s the secret behind choosing the best guitar bridge clamp? It can change your repair game entirely! Through trial and error, I’ve learned that not all clamps are created equal. Selecting the right one not only enhances your repair capabilities significantly but also affects your guitar’s overall sound and structural integrity.
A key consideration is the type of repair you’re undertaking. If you’re working on a vintage acoustic, you might want a more delicate touch—a clamp with adjustable tension is vital here. On the other hand, electric guitars may necessitate a more robust setup. One thing I’ve often told fellow enthusiasts is that investing in a quality clamp can save you from the agony of unintended damage.
From my experience, I’ve found that some of the best guitar clamps are those that combine durability with ease of use. For DIY enthusiasts, a homemade guitar bridge clamp can be an economical and effective option. I’ve personally crafted clamps that have lasted me through numerous repairs without issue. A homemade solution provides a custom fit, tailored exactly to your guitar’s needs.
Portability is another factor often overlooked. If you’re like me and enjoy repairing instruments on the go, a clamp that’s both lightweight and portable becomes an invaluable tool. This way, you can maintain your instrument anywhere and at any time.
Remember, the right choice aligns with both the technical demands of the repair task and your personal style. Prioritize features like build quality, ease of adjustment, and appropriate size. With these insights drawn from my own experiences, you’ll be better equipped to select the ideal clamp that complements your repair endeavors perfectly.
How to Use a Guitar Bridge Clamp
Preparing the Guitar

Preparation is key in any repair process. I always emphasize the importance of getting your workspace and guitar ready before diving in. Ensuring a *clean, organized area* not only helps you focus on the task but also avoids potential damage to your instrument. Before using guitar bridge clamps, gather your necessary guitar repair tools. A set of screwdrivers, soft cloths, and specialized tools for any unique features your guitar might have are essential. This will make the process seamless and efficient.
Begin by giving your guitar a thorough inspection. Check for any existing issues like loose strings or damaged surfaces. This *preliminary check* helps in identifying if any additional maintenance is required alongside the bridge repair, thereby enhancing your guitar maintenance regimen. The next step is to gently clean the guitar, removing any dust or grime that could affect adhesion.
Once the guitar is prepped, you’ll be all set to apply the clamp with confidence. This attention to preparation ensures the repair process is smooth and effective, leading you seamlessly into the next step of confidently applying the clamp.
Applying the Clamp
In my experience, applying the clamp correctly during guitar bridge gluing is where a DIY enthusiast transforms into a true craftsman. It’s not just about placing the clamp and tightening it—it’s an art. The key is understanding the balance of pressure. Too much force can damage the guitar body, whereas too little might cause a weak bond.
Begin by ensuring the bridge is aligned perfectly on the guitar body. Use a ruler or a template to verify that it matches the original position, especially crucial if it’s a repair. Once positioned, gradually tighten the clamp. This step is crucial and can be a bit tricky. In my hands-on experiences, I’ve learned that a gentle tightening sequence—alternating between clamps if you’re using more than one—ensures even pressure distribution.
It’s worth noting that the type of clamp affects application technique. DIY guitar bridge clamps often have unique tension systems, requiring familiarity beforehand. As you tighten, inspect the glue squeeze-out; it should be consistent around the bridge perimeter, indicating sufficient pressure. Don’t rush. Patience here ensures a reliable bond.
With the clamp now applied correctly, the next step in our process is safely removing it post-cure, which demands equal attention to detail and will effectively complete your repair with precision and care.
Removing the Clamp
After the precision involved in repairing guitar bridges, knowing how and when to remove a clamp is crucial to ensure a seamless result. Just as important as application is the skillful removal of the clamp, as premature or hasty actions can undo hours of painstaking work. I’ve learned some valuable lessons from hasty removals—trust me, patience is your ally here. It’s essential to wait until the adhesive has fully cured, a step experienced guitar luthier tips emphasize. This typically takes at least 24 hours, though checking the adhesive’s specific instructions ensures you’re on the right timeline. With gentle hands, carefully release tension without forcing the clamp to avoid any damage.
The removal not only marks the completion of the repair but also sets the stage for checking your work and ensuring the guitar is rejuvenated to its optimal state. Thus, this attentive post-application step strengthens the entire repair process, allowing for a more robust and lasting result.
Common Mistakes to Avoid
Think you know everything about guitar bridge clamps? You might be surprised to find out just how many mistakes can be made! Over the years, I’ve compiled a list of common pitfalls in guitar bridge repair—avoiding them can save you time and frustration. One frequent blunder is the failure to properly prepare the guitar surface before applying the clamp. Ensure the surface is clean and dry to avoid slipping or inadequate bonding.
Another common oversight is using inadequate pressure. Too little tension might result in weak adhesion, while too much can damage the guitar’s finish. Finding the right balance is key. A lesson I learned the hard way is to always check the alignment multiple times before securing the clamp. Misalignment can lead to a misfitting bridge, affecting the guitar’s playability.
Rushing through these steps can lead to unforeseen problems down the line. Patience is your best friend when it comes to guitar maintenance. Don’t forget to protect delicate areas around the bridge with padding or tape to prevent accidental damage. By being mindful of these common mistakes, you’re not only safeguarding your instrument but also enhancing your repair skills. These insights come from my own experiences and countless hours spent at the workbench. Take them to heart, and your DIY repair journey will be that much smoother.
FAQs
What are guitar bridge clamps and why are they important?
How do I use guitar bridge clamps for DIY repairs?
What types of guitar bridge clamps are available?
Conclusion
Are you ready to tackle your next guitar repair? The knowledge you’ve gained here can set you on the path to success! As we wrap up this comprehensive guide, it’s clear that mastering the use of a guitar bridge clamp can transform your approach to guitar maintenance. From understanding the benefits of these indispensable tools to knowing when and how to use them, you’re now equipped with key insights to revive your instrument’s sound.
As someone passionate about lutherie, I hope this guide inspires you to take on DIY guitar repairs with confidence, especially using bridge clamps. Whether you’re a seasoned musician or just starting out, the ability to perform efficient and safe repairs can significantly enhance your musical journey. By avoiding common mistakes and selecting the right tools, you ensure that your guitar remains in peak condition. Embrace the art of lutherie, and let each repair be an opportunity to deepen your craft and connection with your instrument. Keep strumming! 🎸
R.M. Mottola, an engineer-turned-luthier, revolutionizes stringed instrument design with his deep focus on acoustics and ergonomics since 1994. As editor of the Savart Journal and a key contributor to American Lutherie, Mottola merges science with artistry in lutherie. He enriches the field with his extensive knowledge, shared through his Liutaio Mottola website, making him a beacon in the world of modern instrument craftsmanship.