Imagine wielding the power to create your own music, not just with your fingers, but with your bare hands; shaping, moulding, and carving until the melodious echoes of a resonator guitar resonate through the room. I’ve ventured down such a path, and I can tell you, the thrill is unparalleled. This is the tale of my journey with my resonator guitar kit, a transformative experience that led to the formation of magic in melody, a symphony in solitude. To experience such enchantment yourself, read on.
With numerous years under my belt as a luthier and a passion that sings through the strings of a resonator guitar, I wish to hand the baton to you — the one that allows you to conduct magic. This guide is a testament to my experiences, written with the intent of empowering you to build your own resonator guitar, imbuing it with your unique touch.
A resonator guitar kit is often seen as an intimidating venture. However, I stand firm with my claim that the thrill of creating your own instrument surpasses the initial hesitations and stumbles. Stay with me, as I deconstruct not only the components and steps of assembling the guitar, but also the thought process behind each action, ultimately reconstituting it into a form of art.
Resonator Guitar Components
Overview of Components

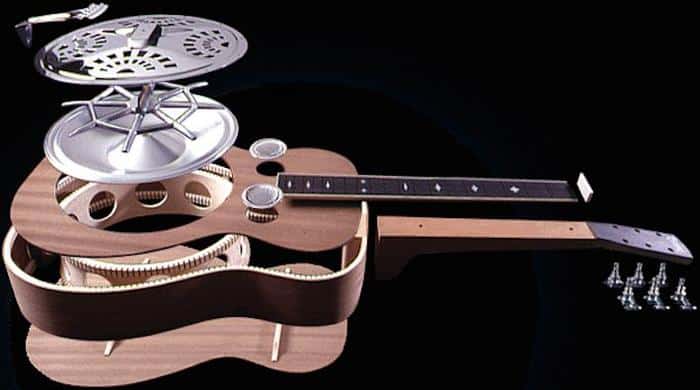
Building a resonator guitar is like assembling a sonic puzzle; each piece, each of the resonator guitar components contributes indispensably to the final masterpiece. Here’s a succinct overview based on my years of research and practical application in the art of lutherie, detailing why each part is paramount.
At the heart of it all, you’ll find the cone or resonator – the guitar’s voicebox, if you will. The tone and projection of the sound are fashioned largely by the type, material, and construction quality of this component. The neck and the bridge are also key elements, directly influencing playability and intonation. Additionally, the design and substance of the body carry weight, determining the acoustic resonance and overall aesthetic.
All these resonator guitar components come together in harmony to give this instrument its distinctive sound and character. Whether you prefer a warmer, woodsy tone or a crisp, metallic twang, the selection and combination of these components shape your instrument’s voice. So, familiarize yourself with the role and significance of each part before you embark on this journey of constructing your own resonator guitar.
Keeping these considerations in mind can transform a DIY kit assembly from a mechanical drill to an adventure in acoustical craftsmanship. An in-depth overview of components is the first step towards creating a resonator guitar that is both a visual and musical delight.
Understanding Specific Components
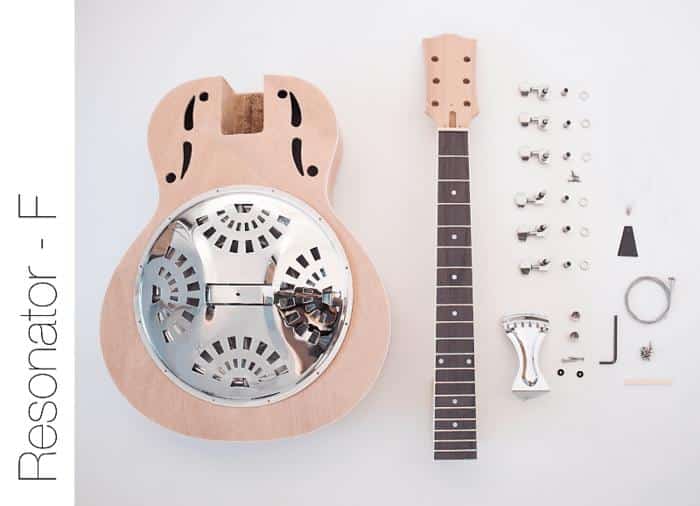
Gleaning knowledge from previous sections, let’s now delve deeper into understanding specific resonator guitar components crucial for our do-it-yourself assembly. Particularly, I’ll focus on dobro kits and piezo pickups, components I’ve used countless times in my work and I believe, are essential to a unique sound-producing experience.
Dobro kits are rich in character and exude a distinct metallic twang, ideal for blues, country and bluegrass music. Mastering the assembly of a dobro style resonator guitar immensely contributes to understanding overall guitar craftsmanship. You see, the dobro’s unique cone design offers insight into how intricacies of design remarkably affect sound output and tonal quality.
Piezo pickups, on the other hand, are transducers that convert vibrational energy into electrical signals. Including a set in your kit enhances amplification without compromising the guitar’s acoustic properties. Essentially, piezo pickups do not just amplify; they capture the essence of your guitar’s unique sound, projecting it to your audience as genuinely as possible.
By understanding these specific components, you build not just a guitar but an instrument tailored to resonate with your musical vision. Having a firm grasp on the functionality of each element within your guitar, your DIY project enters a realm of personalisation, where every tweak aligns your resonator guitar with your harmonic sensibilities.
Pushing forward, we’ll embark on our DIY resonator guitar assembly process, step by step, ensuring each part of your kit finds its perfect place in creating quality sound.
Resonator Guitar Assembly Process
Starting the Assembly Process

Moving forward from the stage of understanding the specific components, let’s delve into starting the resonator guitar assembly process. Keep in mind the importance of this phase in the wider context of the ‘Resonator Guitar Assembly Process’ section. It sets the groundwork, laying a solid foundation for the steps that follow, determining the overall success and musical resonance of your DIY guitar kit.
As an engineer by training, I approached my first guitar kit with a systematic mindset. My focus was to ensure that each part, each screw, each wire was in its correct place. Its relevance here comes from its contribution to the overall assembly process; like a series of dominos, each step influences the other. A well-executed start to this assembly minimizes risks of unwelcome surprises later.
Allow yourself the time to lay out all parts, compare them with the kit’s inventory, and familiarize yourself with their unique role in your resonator guitar. Assemble your tools; double-check that they match those recommended in your instructions. Prior preparation is a fundamental first step in getting it right the first time.
Clear your workspace and consider wrapping delicate parts in cloth – insurance against accidental damage. Savor this moment. As you gently begin to piece together the separate parts of your DIY guitar kit, imagine the sweet, distinctive sound that resonator guitar is known for.
In no time, you’ll be able to reflect on this step and realize its importance in a successful resonator guitar assembly process. From ensuring that all components are in place and undamaged, to the logical assembly of the planned steps, everything you do here will influence the quality and sound of your end result.
Next up, I will share specific ‘Step by Step Instructions’ that have worked for me, taking you deeper into the heart of the assembly process. Remember, creating your own resonator guitar is not only about the end product but also about the journey – the careful nurturing of each component, and the joy of seeing it form into a musical instrument that is truly your own.
Step by Step Instructions

Building a resonator guitar from a kit is a musical journey, a blend of patience, craft, and creativity. Each guitar I construct is a classroom, a learning expedition that challenges yet rewards my craftsmanship. Through countless handcrafted examples, my guitar kit instructions have progressively become more honed and precise, providing a roadmap through the necessary steps to successful assembly.
Navigating these steps is crucial in the Resonator Guitar Assembly Process. For the first impressions, ensure your workstation is clean and well-organized. A clutter-free environment facilitates focus and precision, both vital during assembly.
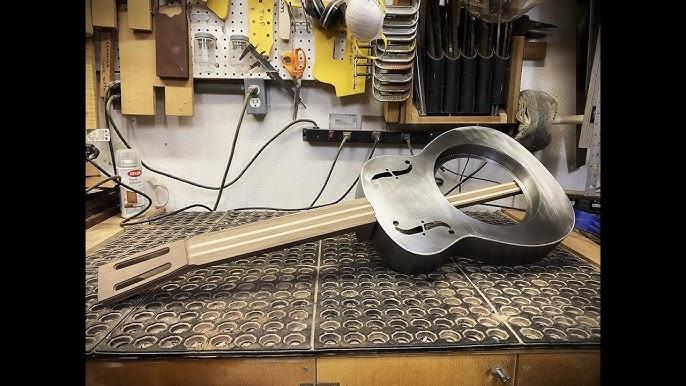
The first step lies in assembling the neck and body. Your chosen guitar kit should come with detailed instructions on this, specifying the tools needed and the time commitment. Confirm all components are included before embarking on this important stage.
One important point to stress here is the alignment. Precise alignment of the neck and body is vital for the guitar to play correctly. Double-check and adjust if necessary. Post-alignment, you will attach the fingerboard. This needs to be glued on and should lay perfectly flat on the neck.
Once the body and neck are assembled, the resonator is next. It’s the heart of this guitar that gives it its unique sound. The resonator should fit snugly into the body of the guitar and be carefully secured. With the resonator in place, you can now attach the strings. String order is important, as it affects the playability and tone of the guitar.
No procedure is devoid of potential pitfalls. Sometimes, minor adjustments will be required. Through each iteration of the assembly process, I’ve learned the value of patience and persistence. These step-by-step instructions hold the key to transform a collection of components into an instrument capable of creating beautiful, melodious sounds.
The process should not be rushed; it’s a labor of love after all. Remember, imperfections are not defeats; they’re learning opportunities. Moving forward, we will discuss how to select the right resonator guitar kit, ensuring you avoid any unnecessary hurdles on your journey and truly personalize your craft.
Choosing the Right Resonator Guitar Kit
Things to Consider When Buying a Kit
Having traversed the realm of DIY guitar assembly, I’ve realized that the key to a successful project lies in selecting the right resonator guitar kit. Based on my journey, not all guitar building kits are on par—some excel while others barely meet the mark. Allow me to impart some wisdom on the factors warranted careful consideration when purchasing a kit.
Quality is paramount—emphasize on the integrity of the materials included in the kit. My countless hours of assembly have taught me that solid wood components ensure better resonance, and thus, superior sound quality. Next, consider the complexity of the kit. Beginners might prefer a resophonic guitar kit that requires less complicated assembly steps, while seasoned builders may seek a challenge.
Never overlook the accessibility to support. Kits offering detailed instruction manuals or online resources pave the way for smoother assembly experience. One should account for the need for any additional tools not included in the kit. Lastly, price per value is a practical consideration. Always strive for a balance between affordability and quality.
In the next step of this DIY journey, I’ll bring forward my top selections of resonator guitar kits, offering an understanding of their uniqueness and potential benefits. These key insights, tailored from my personal experience and expertise, are intended to guide you towards a fulfilling DIY resonator guitar project. Stay tuned.
Reviewing Top Resonator Guitar Kits

Applying my experience of building resonator guitars from various kits, it’s critical to review the top guitar kits before diving headfirst into assembly. I’ve discovered that the key to choosing the right kit lies not only in understanding the components but also in thorough guitar kit reviews. Each kit has its strengths and weaknesses, creating unique challenges and rewards in the building process. I’ve narrowed down my top picks, based on factors like ease of assembly, quality of components, and tonal outcome. This isn’t about selecting the most expensive kit, but remembering that quality and value aren’t always synonymous. By sharing my experiences and insights on these top kits, I hope to help you make an informed choice for your DIY resonator guitar project.
Remember, a clear understanding of the kit before buying can save you from unnecessary complications later. Through my review, let’s uncover the best kits for your resonance journey.
Tips for Success
Building a resonator guitar is indeed an intricate art, peppered with a mix of mechanical savvy and musical passion. It starts right from selecting the perfect guitar luthier kit to finalizing the open G tuning. The mastery lies in the details and the process is as much about the journey as it is about the end result. During my time as a member of the New England Luthiers, I’ve refined my guitar craft significantly, learning from the sea of shared knowledge and diamond insights coming from experienced seniors in the field.
Every guitar builder has a set of secret techniques. Let me share mine with you. For me, success begins when I choose the right resonator guitar kit. And by right, I mean one that suits my skill level, resonates with my musical preferences, and offers a premium quality build. Understanding the components of the kit and their functions is a key part of the process. Remember, the devil is in the detail.
In the guitar craft, patience is certainly a virtue. The assembly process, from attaching the neck to fitting the resonator, needs to be undertaken with the utmost care and precision. Go slow and steady, double-check every adjustment, and remember to breathe — over time, this has served to be a winning mantra for me.
Tuning is the final frontier in your guitar-building journey, where your creation truly comes to life. While there are several tuning options available, going for open G tuning works best with resonator guitars, offering a unique, rich bluesy sound.
I usually conduct the tuning in a quiet, distraction-free environment to ensure I’m able to hear the subtlest of tones and make necessary adjustments. Over the years, this meticulous focus on the tuning process, with consistent fine-tuning afterwards, has helped me achieve excellent acoustic balance and mastery over resonator guitar construction.
To conclude, remember the essence of guitar craft is a blend of proper technique, nuanced understanding, patience, and a dash of personal creativity. Just keep the passion alive and the rest will follow. Get set, pick your guitar luthier kit, immerse yourself in the process, and create your masterpiece.
In the next chapter, I will address common questions that arise during the kit assembly process and share additional tips to navigate through potential challenges. Always remember, knowledge builds expertise, and mistakes often pave the way to perfection.
FAQs
What is a Resonator Guitar?
What Is the Benefit of Building a DIY Resonator Guitar Kit?
What Included in a DIY Resonator Guitar Kit?
Are there any Special Tools Required for Building a Resonator Guitar?
Conclusion
In conclusion, building your own resonator guitar isn’t just a test of technical skill, but a fulfilling journey into the heart of music making. It gives you an intimate comprehension of this remarkable instrument and the components that allow the resonator guitar its unique, haunting voice. This DIY journey involves understanding specific components, diligently following the assembly process, and choosing the right kit that suits your abilities and musical preferences.
Imagine the pride and sense of achievement you’d feel playing a guitar you built from scratch. Are you ready to embark on this journey? Armed with the information in this guide and a bit of patience, you are well on your way to making it a reality.
Building your own guitar from a DIY kit is not an undertaking meant only for expert luthiers. Helped by comprehensive step-by-step instructions, even a novice can enjoy assembling their own instrument. Beyond building, the journey offers valuable lessons and tips for success, addressing common FAQs to resolve any hiccup on the path to owning a guitar that is truly your masterpiece, your personal symphony forged in wood and strings.
In my experience, it’s an immensely rewarding venture, leading to a deeper appreciation for the instrument and priceless satisfaction. Here’s to your journey and the music you’re about to make.