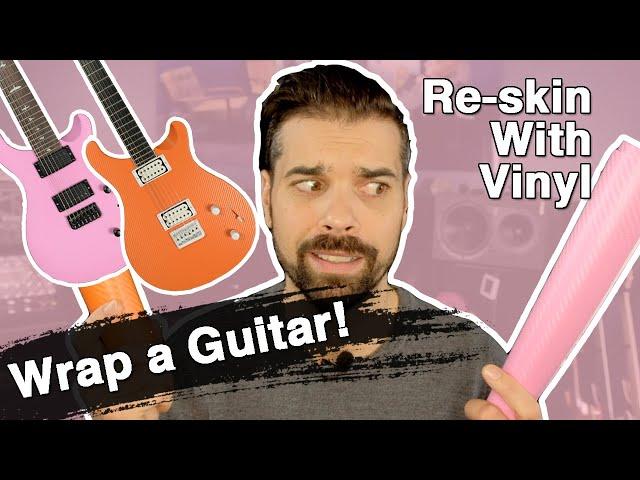
Imagine standing on stage, bathed in the spotlight’s glow, your guitar gleaming like a gem. The applause of the crowd roars in your ears, faces awestruck by the stunning visual spectacle that is your customized guitar. It’s not just a musical instrument, it’s a visual representation of your unique style, your creative identity. Isn’t it fascinating how a simple vinyl wrap can transform an ordinary guitar into a stunning showstopper?
Well, this may sound unbelievable, but more than 70% of guitarists believe customized guitar skins contribute significantly to their on-stage persona and performance. Surprising, isn’t it? Today, we will lift the veil from this fascinating world of vinyl wraps, allowing you to witness the miraculous transformation a simple sheet of vinyl can bestow upon your beloved six-strings.
Let me introduce myself. I’m a fingerstyle guitarist and a lifelong music enthusiast. As someone who’s experienced the beauty of custom guitar skin wraps, I’m thrilled to be able to share with you my insights and the step-by-step process of wrapping your guitar in vinyl.
In this comprehensive guide, we’ll explore why you might choose vinyl wrapping over painting, the materials and tools you’ll need, and the actual process of application. I’ll also share tips on perfecting your wrap, along with maintenance and safe removal strategies. And of course, we’ll talk about exploring creative designs and custom options unique to your style. This sonic adventure awaits you, so why wait any longer? Let’s dive into the world of vinyl wrapping for guitars!
Why Choose Vinyl Wrapping Over Painting Your Guitar

Just ask any old hand in the world of guitar customization, and they’ll tell you that one of the critical elements of the process involves the decision to use paint or opt for a vinyl wrap. I’ve been immersed in this work for years, and I assure you, there’s a reason why I stand by the use of vinyl wraps. It provides an efficient and potent tool to truly express your creativity.
Now, you wonder, how does this vinyl wrap vs paint argument play out? Have you ever gotten frustrated with the limitations of scruffy paint jobs, despite the time and energy spent on them? I get it. Painting requires absolute precision, a steady hand, and a profound knowledge of materials — it’s no walk in the park. When you also factor in the drying time, the likelihood of errors and the necessary touch-ups, you sometimes find your guitar out of commission for much longer than planned.
That’s where vinyl wraps come in.
Vinyl wraps, on the other hand, offer an instantaneous transformation for your guitar. Getting it right does take practice, but it’s decidedly less messy and time-consuming than paint. Plus, you’re not confining your customization efforts to the limited palette of colours that paints usually offer, but instead, have the liberty to choose any design you fancy, including the most radical and distinctive artwork.
But there’s more to the story than convenience and aesthetic appeal. It’s also about the durability factor — a major point in vinyl wrap vs paint debate. What’s the purpose of spending hours customizing your guitar, only to see the paint chip and wear off after just a few sessions? This predicament is avoided with vinyl wraps. Its durability far exceeds that of paint and stands up to the rigors of regular usage without compromising on the vibrant original design. It also provides a thin layer of protection for the guitar’s underlying original paint job — a definite bonus. Plus, if you feel like switching things up, vinyl wraps can be removed without causing any damage to the guitar or leaving a sticky residue.
In my experience, vinyl wrapping your guitar is a no-brainer. It combines the practicality of durability with the freedom to adopt any design you wish, providing a unique opportunity for guitar enthusiasts to express their creativity. And why wouldn’t you want that? After all, your guitar isn’t just an instrument, it’s a reflection of your personality, your unique sound, and, ultimately, your story.
So, there you have it. These points shed some light on the vinyl wrap vs paint stand-off, and I must say I’m in favor of vinyl wrapping for its simplicity, durability, and customization potential. You want your guitar to sing your song, both musically and visually. And in my book, vinyl wrap helps you accomplish just that.
The Materials and Tools You’ll Need for Vinyl Wrapping a Guitar
Choosing the Right Vinyl for Your Guitar
As we delve deeper into the materials and tools required for our project, let’s discuss a paramount choice: selecting the right vinyl for your guitar. Drawing from my own experience, I cannot stress enough the importance of methodology in this decision. It’s all about understanding guitar skins and guitar decals and their contributions towards personalizing your instrument.
Initially, my choices were guided by aesthetics but over time I realized that the type of vinyl significantly influences the final result. So let’s not underestimate the importance of getting this right. I recommend opting for high-quality cast vinyl, an inherently flexible material ideal for wrapping around the curves of a guitar. Its durability ensures long-lasting colours that won’t fade easily.
Create a prototype if you’re unsure about your vinyl or design. Here’s where guitar decals come into play. Use them to try out potential looks on smaller sections of your guitar. Just remember, adhesive vinyl won’t conform to shapes and contours as well as heat-activated vinyl.
In my journey, I’ve found that each vinyl wrap rejuvenates my guitars, beautifully augmenting their visual appeal.
The upcoming segment will outline the required tools for vinyl wrapping, ensuring a seamless application.
Tools Required for Vinyl Wrapping
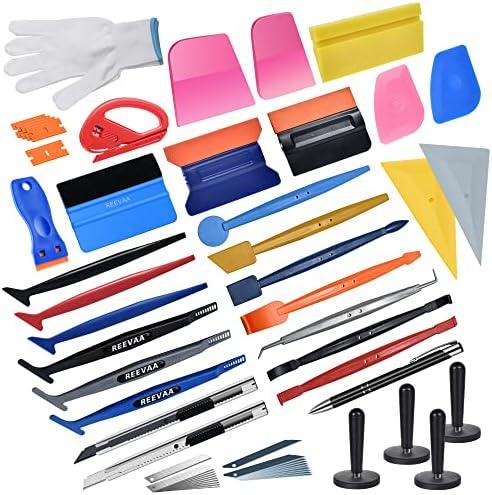
Drawing from my practical insight, let’s zero in on the essential tools required for the process of applying a vinyl wrap to your beloved guitar. The correct set of tools is crucial for a seamless, proficient application and contributes to a durable, aesthetically stunning result.
To begin, a high-quality vinyl squeegee is paramount. It helps to seamlessly apply the vinyl wrap while pushing out the unwanted air bubbles. Next, consider using a heat gun, instrumental in stretching the vinyl over the curved edges of your guitar. However, exercise caution; excessive heat can damage both the vinyl and your instrument. Safety tools like cut resistant gloves are also essential while handling sharp objects. Additionally, a precise cutting tool is needed to carefully trim off the excess vinyl, respecting the unique contours of your guitar.
This selection of tools enhances the vinyl wrapping process, integrating professional techniques within your personal DIY endeavor. Remember, the right tools don’t just facilitate application; they enhance your craftsmanship, ensuring your vinyl-wrapped guitar proves equally remarkable for its flawless finish as for its resonant chords. Everything considered, proper tool choice is the cornerstone in making your vinyl wrapping project victorious.
Step-by-Step Process of Applying the Vinyl Wrap to a Guitar
As we step into the heart of our comprehensive guide, one thing became clear: lacing your guitar with a vinyl wrap is indeed much like donning your fingers on the fretboard, each move a calculated stroke paving the path to a harmonious symphony. Wrapping your guitar is a step-by-step process, much like the steps you take when learning a new guitar riff or song. My journey of vinyl wrapping my own guitars has been full of learning curves and moments of sweet victory. Now, I’ll share the insight I’ve garnered, so you too can master the smooth, bubble-free vinyl installation on your beloved instrument.
Consider this a backstage pass into my world of vinyl wrapping techniques. In recounting my experiences, I hope to equip you with the necessary knowledge to navigate this process with confidence and finesse.
First of all, measure up. Understand the dimensions of your guitar’s body. The last thing you’d want is a wrap that’s too small or excessively large. With precise measurements, you’re already once step closer to a snugly fitted wrap.
Vinyl Prep. This next step is possibly the trickiest but rest assured, the alleyways of error narrow with practice. Start by peeling off a small corner of the backing paper. Extend it over the edge of the guitar, not adhering it just yet. This conducive start allows you to peel off more of the backing as you progress.
Watch out for the bubble-free installation. As you progress with the wrap, keep a close eye on air bubbles. It’s quite tempting to rush through the process, especially if you’re excited to see the end result. However, haste often leads to trapped air. Therefore, take your time. As cliche as it sounds, slow and steady does win the race here.
On to heat molding vinyl on your guitar. As your wrap begins to take shape, it might encounter resistance, especially around the curved edges. Fear not, for heat is your ally. A hairdryer on a low setting is all you need. Applying it in short bursts will render your vinyl wrap more pliable, effortlessly hugging the contours of your guitar. I personally enjoy this part the most; there’s just something fascinating about watching the wrap begin to mirror the exact shape of my guitar.
Next is trimming: the vinyl excess will need to be removed. I suggest a sharp craft knife, an instrument that allows precision. Be mindful of this step. Your craftsmanship, your respect for the guitar’s form, reflects in these little details.
Finally, run your hand over the vinyl, feel for any inconsistencies or minor mistakes. The proud feeling when you touch the smooth, flawlessly wrapped surface of your guitar? — that’s the best part. Each guitar I’ve wrapped holds a story, a testament to patience and perseverance. I hope your journey leaves you with a similar token of accomplishment.
To conclude, in your hands now lies a guitar transformed, its look tailored to your musical wavelength. You’ll be surprised at what a difference this simple act of personalisation can make. The moment you strum the strings of your freshly wrapped guitar. That’s a song only you would understand.
In the following chapters, we will delve into the finer details of perfecting your vinyl wrap, from cutting and trimming to finishing. We will discuss the maintenance of guitar wraps and explore various designs and custom options for the personalized touch. Hold on to your passion, for it’s an exciting ride ahead in the realm of guitar wraps.
Perfecting Your Vinyl Wrap: Cutting, Trimming and Finishing
As I moved on from applying the vinyl wrap to my first guitar, I realized the process wasn’t quite finished. I had to perfect its finishing. The final appearance of the guitar was at stake. I had to master the meticulous craft of cutting and trimming vinyl wraps. From personal trials and triumphs, I’ve honed these techniques, and I look forward to sharing these valuable insights with you.
You’ve wrapped your guitar, but the job isn’t done yet—how do you make it truly shine? This is where cutting, trimming and finishing come into play. Think of it as a sculptor shaping a block of marble, revealing the beauty underneath.
Cutting and trimming vinyl wraps require precision and patience. Firstly, cut the excess using an easy blade or precision knife. Being too hasty or using excessive pressure could risk damaging the guitar’s body. I found maintaining a steady hand and moving slowly yielded the best results. The relief cuts should be carefully positioned to accommodate the guitar’s natural curves. Avoid pushing the blade into the vinyl; let the blade do the work itself. Remember, patience is key—better take your time than rush the process and yield a less-than-desirable outcome.
The next phase is trimming. I can’t emphasize enough the need for caution here, as one wrong move could ruin the vinyl or scar your beloved guitar. Utilize the precision of a fresh scalpel blade and always cut away from the surface to minimize risk. Cross reference your trim marks, ensuring they align smoothly with the curvature of the guitar’s body.
Once these steps are completed, you’re ready for finishing, which involves heat application to bond the vinyl to the guitar’s surface. The precise amount of heat needed varies, but I’ve found that too much can damage the vinyl while too little leaves it looking unpolished. Through trial and error, I discovered the ideal balance, making sure the vinyl was tightly bonded without compromising its aesthetic quality.
With time and experience, my knowledge of perfecting vinyl wraps grew. Every milestone in cutting, trimming, and finishing brought me closer to achieving that flawless wrap finish. Bear in mind, every guitar and vinyl wrap is unique, so take the time to fully understand your tools, materials, and guitar’s specific shape. Mastering these final steps can transform your wrapped guitar from good to extraordinary.
Removal and Maintenance of Guitar Wraps
How to Safely Remove Your Guitar Wrap

Having explored the realms of applying and perfecting your guitar’s vinyl wrap, let’s segue into the equally crucial domain of its safe removal. Honing the process of removal of guitar wrap, from my years of experience, is pivotal to maintaining the pristine state of your guitar’s underlying surface.
Treating your guitar with respect and catering to its nuances during wrap removal will ensure the guitar surface remains undamaged. Start gently, at the edges, loosening the wrap bit by bit. Patience is vital as hasty removal could lead to unwanted residue or, worse, surface damage. Depend on a non-abrasive, mild adhesive remover for lingering stickiness, but always do a patch test first.
Embrace the process, taking your time. Remember, the quality of your guitar resides not just in its sound, but also in the integrity of its physical structure. Later in this guide, we will also delve into the exciting world of customizing vinyl designs for your guitar, where having an impeccable surface to work on can be truly transformative.
Next, let’s get creative with ‘Exploring Designs and Custom Options for Guitar Wraps’. After all, every strum should resonate with your identity, and an eye-catching wrap is a canvas for your musical soul.
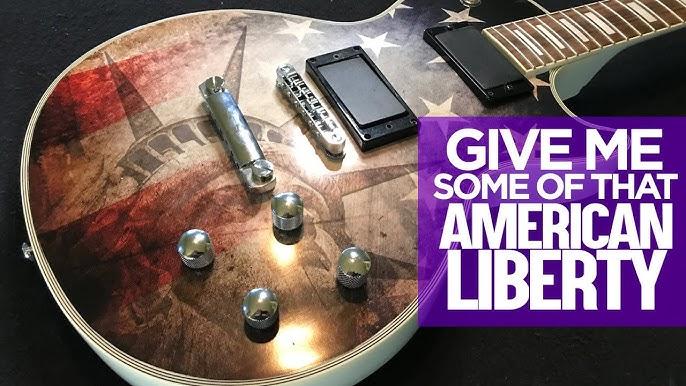
Exploring Designs and Custom Options for Guitar Wraps

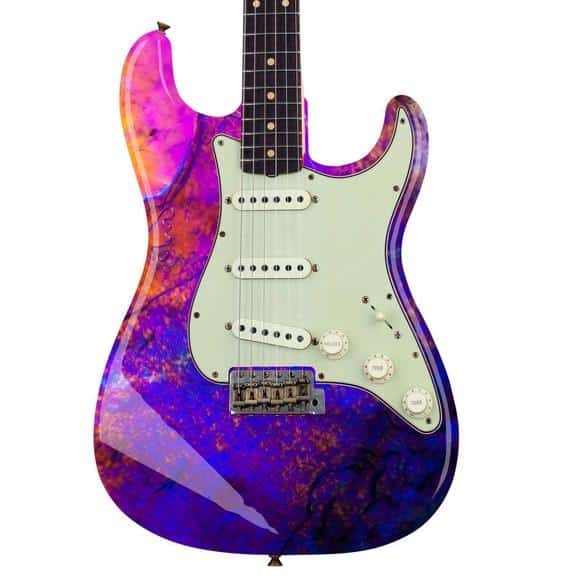
When it comes to vinyl wrapping your guitar, one thing is for sure: the market is flooded with a plethora of guitar wrap designs, each more interesting than the last. But are these designs truly capable of capturing your essence and mirroring your unique style through your instrument? With custom guitar skin wraps, the promise of personalization unfolds, creating an avenue to add a dash of ‘you’ to your guitars.
Can a guitar wrap truly reflect your personality? The answer lies in the impression you wish your instrument to convey. Whether you’re a rock and roll fanatic, a country soul, or a jazz enthusiast, a thoughtfully chosen guitar wrap can emulate your genre inclinations and individual nuanced preferences.
With a keen eye developed through years of experience, I can provide suggestions and insights on choosing designs and custom options that reflect your individuality through your instrument. Each facet of the guitar wrap’s design conveys a narrative, a story that is uniquely yours. It’s all about identifying what resonates most with you. Whether it’s the symbolism behind an intricate graphic or a color gradient that gives you a sense of calm, every detail plays a role.
The realm of custom guitar skin wraps extends beyond the staple designs. You can select from countless finishes or textures, extravagant graphics, or perhaps you prefer a more minimalist approach. If you’re feeling especially creative, some providers allow you to design your own wrap, creating a truly one-of-a-kind piece.
Exploring design options for your guitar wrap is not just about aesthetics. It’s a journey of self-expression and vibrancy, allowing your personality to shine through your music in every strum. Remember, the perfect guitar wrap is not just visually appealing – it’s a visual extension of who you are as an artist.
As you navigate the array of designs available, trust your instincts. Your taste is as unique as your music, and your guitar wrap should reflect that. Take your time, research, and let the right design find you—and when it does, you’ll know it’s nothing short of perfect.
FAQs
What is a vinyl wrap for a guitar?
A vinyl wrap for a guitar is a protective and decorative coating that can be applied to the body of the instrument. It not only enhances the aesthetic value but also protects the guitar from scratches and damages.
How to prepare the guitar for vinyl wrapping?
Before applying the vinyl wrap, remove all the hardware from your guitar such as the pickups, knobs, and bridge. Then, clean the body thoroughly ensuring that there are no oil, dust, or any leftover adhesive. This helps the wrap to stick better to the guitar.
How to apply a vinyl wrap to a guitar?
Start by aligning the vinyl wrap with the body of your guitar. Then, peel off the backing of the wrap and apply it on the guitar, from the center outward, to minimize air bubbles. Use a squeegee to smoothen the wrap against the guitar body and reposition as necessary. Once done, trim off the extra wrap and reattach the hardware.
Can I use any kind of vinyl wrap for my guitar?
No, not all vinyl wraps are suitable for a guitar. It is recommended to use a cast vinyl wrap as it is thinner, easier to work with, and more durable compared to other types of vinyl wraps. Ensure that it is also heat resistant, to avoid damage from the heat generated by the guitar body.
How to maintain the vinyl wrap on my guitar?
To maintain the vinyl wrap, clean it regularly using a damp cloth and mild soap. Never use abrasive cleaners as it might damage the wrap. Also, protect it from extreme temperature changes as it might cause the wrap to shrink or expand.
Conclusion
As we draw the crescendo to this comprehensive guide, have you managed to wrap your mind around the process of vinyl wrapping a guitar? I hope the ‘Why/What/How’ aspect of the guide has left you better equipped and truly inspired to indulge in the joy of DIY guitar wrap customization.
We navigated through the advantages of vinyl wrapping over painting and deliberated on essential materials, tools, and the selection of the right vinyl. I walked you through every step of the process, right from applying the wrap to mastering the art of cutting, trimming, and finishing to create a flawless aesthetic.
With a focus on the importance of maintenance, we also unveiled the safe methods to remove the wrap when you feel the need for a change. I hope the exploration into the myriad of design and custom options sparked your creativity, and the answers to all your potential queries cemented your understanding.
As someone who truly lives and breathes guitars, I hope that not only have I equipped you with practical knowledge, but also inspired you to uphold the joy of guitar customization that vinyl wrapping can bring. And remember, practice makes perfect. So, go ahead, wrap that guitar!