It was but a humble gig at one of the local bars when my band was hit with a turning point — a moment that honestly petrified us. Midway through our second set, the lead guitar inexplicably fell silent. There we were, exposed and stranded on stage, with the culprit being none other than a faulty guitar output jack wiring. That humbling experience is what led me down the unexpected path of DIY guitar repair. A path of empowerment which I call upon you now to tread.
As an electric guitarist, if there’s one critical skill that ever unexpectedly played a chord with my newfound ethos, it is the art and science of repairing the guitar jack. Not everyone appreciates the genuine significance this little piece of metal holds. To the untrained eye, it’s another small, inconsequential part. But to those entwined in the passionate world of lutherie, a guitar’s output jack is like the voice box of an opera singer—its integrity is fundamental to the harmonious flow of audio signals.
Think of this as the catharsis to self-reliance and a heightened mastery of your instrument. You might even start to see yourself as an adept caretaker of your melodic comrade. With this guide on electric guitar maintenance, you’ll learn not only to repair and connect your guitar jack but also troubleshoot common issues. So, whether seeking to noodle around the blues in your bedroom or ramp up the distortion on stage, remember this creed – knowledge of your instrument’s soul is the key to endless musical merriment.
Embrace this journey. By its end, the show will always go on, even faced with the most clandestine of guitar issues. Prepare to take one giant leap towards liberating yourself from any last-minute, nerve-wracking guitar wiring calamities. Let’s dive into the electrifying world of guitar output jack wiring and its repair.
Understanding the Basics of Guitar Output Jack
Importance of Guitar Output Jack in Audio Signal Flow
Embarking on the journey of understanding the intricacies of guitar electronics, it’s impossible to overlook the significance of the guitar output jack in audio signal flow. Drawing from my early experiences refining my lutherie skills, a keen understanding of this element is fundamental.
Guitar output jacks are the gatekeepers of audio signal flow within your instrument. As the final touchpoint before your guitar’s pure, unadulterated sound meets the amplification process, this humble component packs a considerable punch in shaping your overall sound quality. Just like the final actor in a relay race, the output jack has profound implications on the end result.
Each time a note reverberates through your guitar, it generates an electrical audio signal. This signal journeys through a maze of wires, pickups, and potentiometers before reaching the guitar output jack, waiting patiently to pass the audio signal faithfully to your amplifier. This process is the lifeblood of your guitar’s sound. Therefore, a clean, well-soldered jack is crucial to ensure the audio signal travels without interruption or degradation.
As you dive deeper into the world of guitar electronics, you’ll gain a newfound appreciation for the intricate ballet of audio signal flow while fostering a profound understanding of the vital role your guitar output jack plays in it. Addressing your guitar’s output jack with the respect it deserves allows your instrument to deliver the cleanest and most authentic sound possible, reflecting true musicianship.
Moving on, let’s equip ourselves with the right tools for a proper guitar output jack installation, because attaining stellar sound quality starts with establishing the right connections.
Preparation for Guitar Output Jack Installation

When it comes to guitar output jack installation, time and careful preparation are your best allies. From my experience, even seasoned guitar maintenance veterans understand the critical role of a measured and methodical approach. Certainly, a guitar is not just an instrument; to many of us, it’s a beloved companion, a creative outlet, and an investment. As such, it deserves our full attention during all electric guitar maintenance processes, especially when dealing with its essential hardware.
You might have heard of the saying ‘Measure twice, cut once’. In the realm of guitar maintenance, I’ve found it to be more like, ‘Prepare twice, connect once’. This adage perfectly sets the stage for the meticulous process of guitar output jack installation. It’s a reminder that investing a bit of extra time and effort in the initial stages – in preparation and understanding – saves you a world of hassle down the line.
And therein lies the crux. Just like every meaningful endeavor, you need to start from the ground up; in our case, that’s a solid guitar hardware guide. A good guide not only tells you what to do but why you’re doing it. This is vital in developing a comprehensive understanding of the process. Remember, we’re not just doing a routine task; we’re involved in the intricate care of an instrument that brings joy to our lives.
The right tools, a neatly organized workspace, and a quiet, comfortable environment – these elements form the foundation of a successful guitar output jack installation. From my years of tinkering with guitars, I’ve seen how haphazard approaches can sadly result in damaged guitars and frustrated musicians.
Time is another huge factor. When you’re caught up in the pressures of a hectic life, it might be tempting to rush through the process. Believe me, I’ve been there! But in my experience, it’s always better to wait for a calm, unhurried day for tasks like this. A hurried mind is more prone to slip-ups and mishaps, and believe me, your guitar deserves much better than that.
Proper preparation is a cornerstone, not only of guitar maintenance but of all worthwhile endeavors. Having once been a beginner myself, I cannot overemphasize the importance of preparation. The stakes are high but with the right preparation, the rewards are glorious – a guitar that sounds as good as it possibly can.
In our upcoming sections, we’ll delve deeper into all the intricate steps of a professional, well-executed guitar output jack installation. Equipped with these insights, we hope you’ll forge a harmonious relationship with your beloved instrument, one note at a time.
Step-by-step Guide on Connecting and Wiring Guitar Output Jack
Now, ascending to the heart of the article, we’ll delve deeper by running through a detailed journey from my experiences on a step-by-step guide to connecting and wiring your own guitar output jack. We’re not just talking theories or abstract concepts. I’ll walk you through the actual method I’ve developed, tested, and refined over many years and numerous guitar output jack installations. So, let’s lay down the tracks for this exciting journey.
Step 1: Preparation
Before we do any stereo output jack wiring, we need to get acquainted with our tools and materials. You’ll need a soldering iron, solder, heat-shrink tubing, and the right wires. Understanding the role of these tools is as crucial as handling them, which brings me to the shielded wire soldering – the magic link you will use to connect the guitar and amplifier, enabling clear and delightful sounds.
Step 2: Identifying the Wires
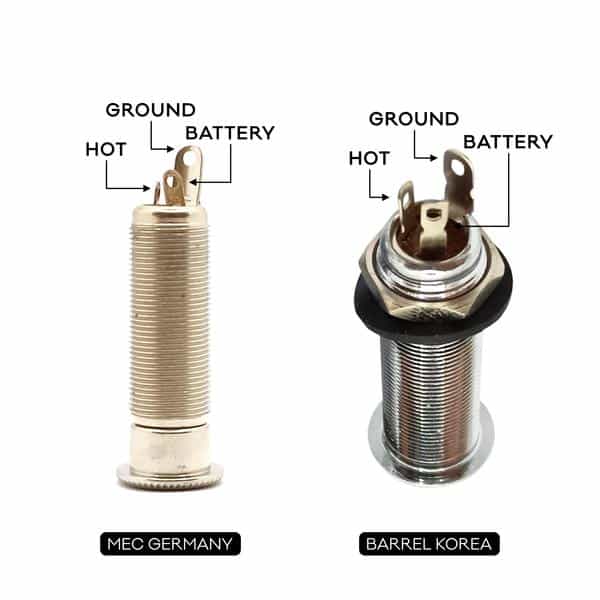
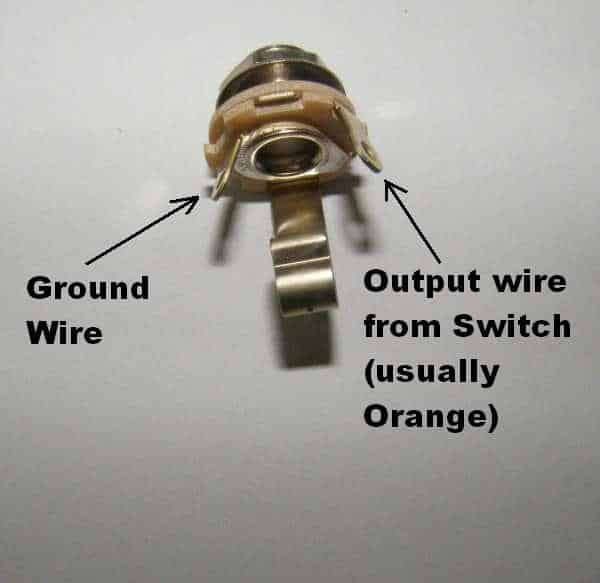
Understanding the concept of tip sleeve wiring is fundamental. The tip carries the signal, and the sleeve serves as ground. A wire conventionally colored red or white goes to the tip, and the black wire or bare wire goes to the sleeve. You’ll usually find the wires shielded: the finely braided outer layer serves as the ground wire, and the inner wire sends the guitar signal.
It’s not rocket science, it’s guitar science! And yes, you can do it with precision if you follow the correct steps.
Step 3: Wiring the Jack
Rewiring a guitar output jack involves connecting the wires to the tip and sleeve on the jack. Thread the wires through the hole of your guitar body to the output jack. Ensure the tip sleeve wiring is correct: the tip wire goes to the ‘hot’ terminal, and the sleeve wire to ground.
Step 4: Soldering
Now comes the crux of your guitar output jack installation – the output jack soldering. Fair warning: don’t rush this process. Carefully solder each wire to the jack points, ensuring a good connection. Once you’ve soldered the wires, give them a gentle tug to ensure they’re secure.
Step 5: Final Check and Clean-up
Before you start strumming, remember to plug the guitar into an amplifier for a final check. We must ensure the wiring is faultless and the sound transmittance is as clear as a symphony. Once you’re satisfied, replace the cover plate, and clean up your workspace.
All these steps might sound a bit daunting now, but I assure you, the more times you do it, the smoother the process becomes. Perseverance is key, and remember, as with any skill, practice makes perfect.
Stick with me, fellow strummers, as we navigate through the next segment where we’ll delve into understanding and troubleshooting common issues. Much like playing a wrong note, even a slight mishap in installation or wiring could disrupt our symphony, so let’s learn how to fine-tune our work.
Understanding and Troubleshooting Common Issues

Every luthier or guitarist encounters certain challenges at some point in their journey, and I am no exception. Over the years, I’ve grappled with my fair share of problems related to guitar output jack wiring. With the aid of my experiences and the knowledge I’ve been fortunate to acquire, I’ll share actionable insights on how to overcome common output jack issues. Understanding these common complications and troubleshooting them not only improves the guitar’s sound quality but also enriches the overall playing experience.
Unwanted buzz during your solo? It might be a simple output jack issue that you can fix yourself! Noise troubleshooting a guitar can feel like a major task when it’s connected with the output jack. But with a little knowledge of what’s happening inside your guitar and some practical steps, you can overcome this hurdle.
One recurring issue that I’ve encountered is the unwanted buzz or humming sound produced by an electric guitar. Initially, I assumed it was a pickup wiring issue, but further investigation often led me to discover it was more about the grounding in the guitar’s output jack. Grounding issues can often lead to horrific ‘earth loop’ noises. This arises when the output jack loses its connection to the ground wire. The simple fix involves re-soldering the wire back onto the jack or replacing the jack if it’s worn out.
A common issue often overlooked is the instrument cable connection itself. Even if you’ve executed a flawless output jack installation, a bad cable can ruin your day by introducing unwanted noise or, worse, no sound at all. Therefore, it’s essential to check your cables regularly for any wear and tear and replace them when necessary.
Among the numerous output jack problems I’ve faced, I was once left bewildered by a guitar that seemed perfectly connected but produced no sound. The culprit here was the output jack’s inner wiring: quite unexpectedly, it was wired backward. It was only when I swapped the hot and ground wires that the issue was resolved.
Perhaps the most frequent issue is loose output jack wiring. It’s inevitable. The constant plugging and unplugging of the instrument cable can loosen the jack’s overall fitting or the wires soldered to the jack. A quick retightening of the jack and re-soldering the wires can usually rectify the problem.
Every guitarist’s journey is filled with lessons, and as I faced these common output jack issues, each one became a stepping stone, enhancing my understanding of the instrument and honing my skills. By sharing this knowledge, I hope to make your journey a tad bit smoother, and together we can keep the music playing on point and uninterrupted.
Remember, the beauty of owning an instrument is not just in playing it but understanding it, feeling that intimate connection every time you troubleshoot and fix an issue on your own. And that’s what finally transforms you into an authentic musician, someone who comprehends and transcends the simple mechanics of sound creation.
FAQs
How do I identify the ground and hot signal tabs on a guitar output jack?
On most guitar output jacks, you will notice two tabs where the jack is connected to the guitar wiring. The larger of the two tabs is typically the ground tab, and the smaller tab is the hot (or signal) tab. The ground tab is usually connected to a wire that leads to the guitar’s bridge.
What type of solder should I use for a guitar output jack?
It is recommended to use rosin-core solder for guitar output jacks. This type of solder is widely used in electronics because it helps the solder flow and adhere to the metal parts, ensuring a strong and reliable connection.
How can I prevent damage to the guitar’s finish when soldering a guitar output jack?
When soldering a guitar output jack, it’s crucial to take care to avoid damaging the guitar’s finish. Use a soldering stand or a damp cloth to catch any drips of hot solder, and keep the soldering iron moving so it doesn’t rest on any one spot for too long.
Conclusion
There you have it, the ins and outs on how to properly handle the intricate process of repairing guitar jack and guitar output jack wiring. This isn’t just a DIY guitar repair guide, it’s a lifeline to the countless musicians who run into these issues regularly. Just think, with this guide in hand, how many fellow musicians you’ll be able to help out the next time their beloved guitar starts giving them static!
From grappling with basic understanding, appreciating the importance of the guitar output jack in audio signal flow, and preparing for installation, to going through each connection and wiring process step-by-step, we’ve tackled it all. Furthermore, we’ve probed into understanding and troubleshooting common issues. While it may seem daunting, these repairs are completely doable with the right tools and a steady hand.
After breathing life into many guitars over the years, the joy that each repair brings is immense. I derive great satisfaction in sharing my experiences and knowledge with you, in the hopes that you can experience the same gratification in your DIY guitar repairs. Keep this guide handy and never let a faulty guitar output jack silence your music. Your guitar is counting on you, and now you are ready and equipped to rise to the occasion.
Remember, practice makes perfect, and the more you familiarize yourself with this process, the more comfortable you’ll feel. But most importantly, don’t forget the love and passion that brought you here in the first place. Now go out there and make some music!