When I first picked up my Epiphone Les Paul, the thrill of playing was soon accompanied by a curiosity about its inner workings. That curiosity led me down the path of re-wiring my own guitar, an endeavor that transformed into a passionate journey into the art of electric guitar craftsmanship. Through countless hours spent researching Epiphone Les Paul wiring diagrams and consulting with seasoned luthiers, I uncovered a wealth of practical insights for both novice and experienced guitar enthusiasts. Understanding the nuances of wiring became my mission, and I found that it’s not as daunting as it first appears. Alongside exploring various wiring methods, I’ve tackled the common concerns—like which materials to use and how to avoid frustrating mistakes. In this article, I’m excited to share the most effective strategies and techniques that I’ve discovered, allowing you to tackle guitar wiring with confidence.
Understanding the Basics
Components of a Les Paul
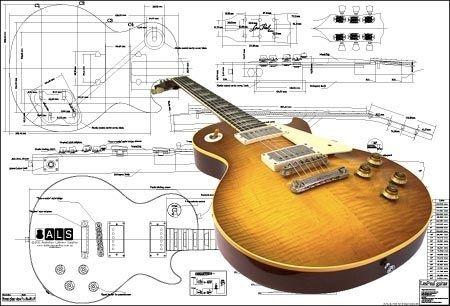
Understanding the components of a Les Paul is essential for any guitar enthusiast looking to delve into the intricacies of their instrument. From my years of research in instrument mechanics, I’ve come to appreciate how each part contributes to the guitar’s rich legacy and distinctive sound. Did you know that the choice of pickups can drastically alter your guitar’s voice? The pickups, along with the pickup wiring, form the core of the guitar’s electronic heart, translating string vibrations into electric signals. This makes them crucial for sculpting the tonal character of your sound.
In addition, the tone and volume control settings allow for precise manipulation of these signals. Adjusting these controls helps shape your guitar’s output, offering a more personalized auditory experience. When I wired my Epiphone Les Paul, understanding each component was paramount. It wasn’t just about connecting wires. It involved a deep dive into how the guitar’s soul is expressed through these mechanical and electronic elements. This knowledge sets the stage for exploring types of wiring diagrams in the following section, where we delve into how different configurations can further customize your guitar’s capabilities.
Types of Wiring Diagrams
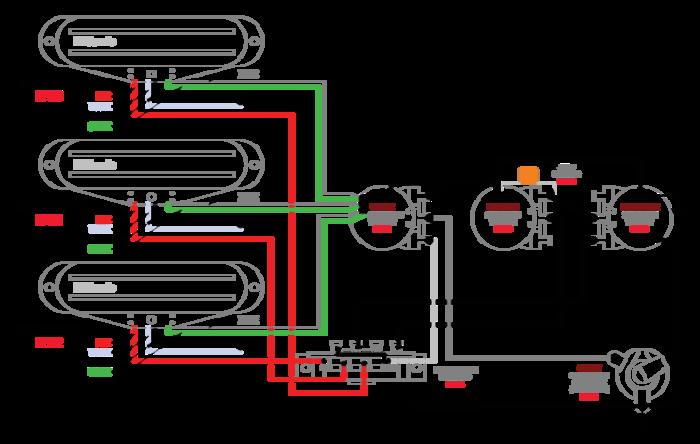
When I first decided to wire my Epiphone Les Paul, I was quickly confronted with the overwhelming variety of wiring diagrams for electric guitars. What if the diagram you’re referencing is incorrect? Understanding the types can save you a headache. Wiring diagrams are more than just schematics; they are essential blueprints that guide the entire wiring process. These diagrams range from simple layouts to complex circuits, and choosing the right one is crucial. In the context of my Les Paul, it was imperative to recognize the specifics related to Epiphone wiring color codes, as these can vary significantly from other guitar brands.
My journey involved navigating through myriad diagrams, each with its distinct notations and complexities. Understanding these diagrams allowed me to avoid costly mistakes and ensured each component functioned harmoniously. This knowledge forms the bedrock of the basics, simplifying even the most challenging wiring tasks and enriching the whole guitar customizing experience. As we move to the next phase, gathering the right materials becomes the focus, aligning all the newfound knowledge with tangible tools necessary for success.
Materials Needed
How do the materials you choose impact not just the wiring, but the sound of your guitar? This question has guided me through nearly every wiring project. Over the years, I’ve come to appreciate how selecting the right materials can be a revelation, transforming what might seem like a mundane technical task into an art form with lasting effects on sound quality.
When I decided to rewire my Epiphone Les Paul, I knew the stakes. My first step was gathering the right components and tools. Quality wire is a must—lower resistance copper wire seemed like an obvious choice for preserving the signal’s integrity. For the capacitors, I opted for orange drop capacitors due to their stellar reputation for clarity and reliability in high-gain applications. The pots had to be top-notch, so I went with CTS potentiometers that provide a smooth taper and consistent performance.
Next, I ensured I had a reliable soldering iron and lead-free solder—they’re indispensable for achieving solid connections without harming the components or affecting tone. Personally, investing in a higher wattage iron paid dividends in crafting those crucial connections without prolonged contact. Armed with a multimeter, I could check continuity and avoid any sneaky issues before closing everything up.
This collection of materials, each chosen with care, became the backbone of the rewiring project. The importance of each was clear as soon as I struck that first chord on my newly-wired Les Paul.
Step-by-Step Wiring Instructions
Preparing Your Guitar
What’s the first step to ensuring a flawless wiring job? Preparation is key! Before I began wiring my Epiphone Les Paul, I immersed myself in meticulous planning, laying a strong foundation for success. As part of the ‘Step-by-Step Wiring Instructions’ process, preparing your guitar is not just a task but an art that contributes significantly to a flawless outcome.
First, I made sure to have all the necessary tools and materials ready, ensuring I wouldn’t be distracted by missing items in the middle of the project. This included a high-quality soldering iron, the specific wiring diagram suitable for my Les Paul, and other guitar modification essentials. Cleaning the guitar’s cavity is another crucial step — dust and debris can compromise connections and lead to frustrating malfunctions later on.
Understanding the layout of the Les Paul components was also important. I spent time familiarizing myself with the existing wiring and components, confirming that the potentiometers and capacitors were in the right condition. Such attention to detail is often the line between a smooth wiring experience and constant troubleshooting later on. By the end of the preparation phase, I was confident and ready to tackle the next step: wiring the pickups.
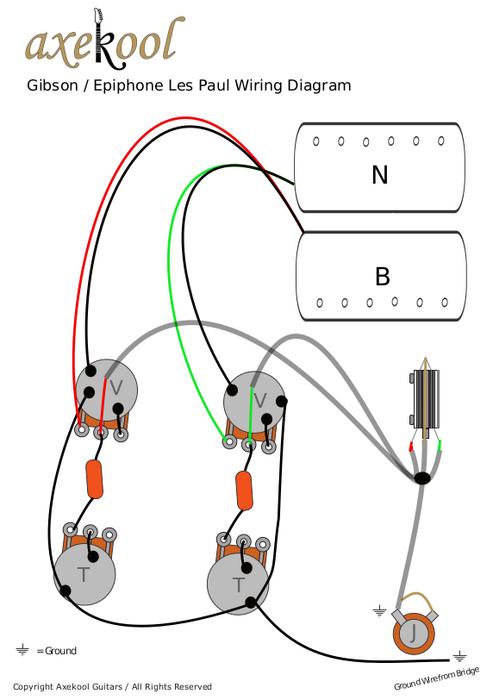
Wiring the Pickups

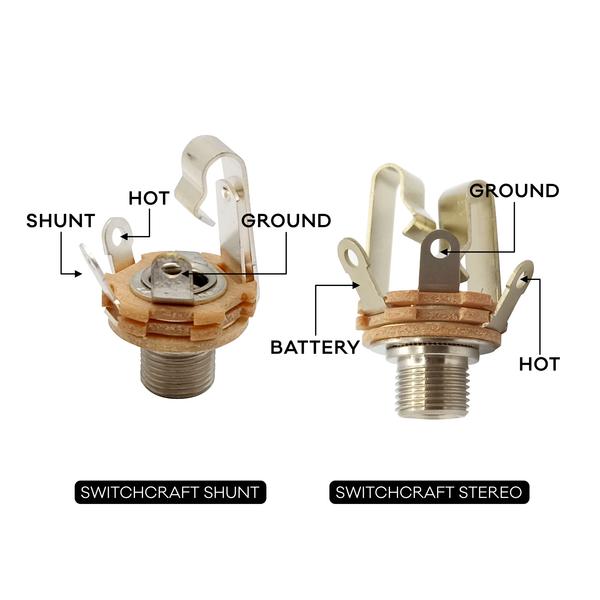
As I delved into wiring the pickups on my Epiphone Les Paul, I quickly learned that understanding the wiring colors is absolutely pivotal. What if the wiring colors don’t match your diagram? Understanding this step is crucial for success. This is where many enthusiasts stumble, especially when encountering mismatched or faded Les Paul wiring colors. In my experience, correctly identifying and matching these colors is essential to achieving that flawless Les Paul tone we all crave.
When faced with a wiring diagram that didn’t align with the colors in my guitar, I relied on insider tips I’ve gathered over years in the field. I meticulously studied the color codes synonymous with Les Paul models to ensure accuracy. This is not just about connecting wires; it’s about knowing the intricate wiring pathways that make a Les Paul sing.
Once the pickups were correctly wired, the culmination of careful preparation and precise execution materialized into astonishing sound clarity and articulation. This attention to detail is the backbone of successful wiring and will pave the way as you move towards connecting the output jack and ultimately testing your work.
Connecting the Output Jack
Did you know that a loose output jack can lead to intermittent sound issues? Connect it correctly! As we’ve navigated through the important elements in the Step-by-Step Wiring Instructions for my Epiphone Les Paul, connecting the output jack is a crucial element that shouldn’t be overlooked. Using my guitar wiring guide, I’ll show you how to secure this critical connection.
The output jack is where your guitar ultimately communicates with the world, transforming its voice into a signal that flows through your amp. First, ensure the wiring is snug; inspect the solder joints for toughness and check the grounding wires. A solid connection here can be the difference between great sound and frustrating feedback. I use a soldering iron to meld the wires carefully to the jack pins, ensuring they’re tightly secured for a clean signal path. My expertise has taught me that precision makes all the difference. As you continue to lay down your wiring, remember to stay methodical and double-check every connection.
Testing Your Work
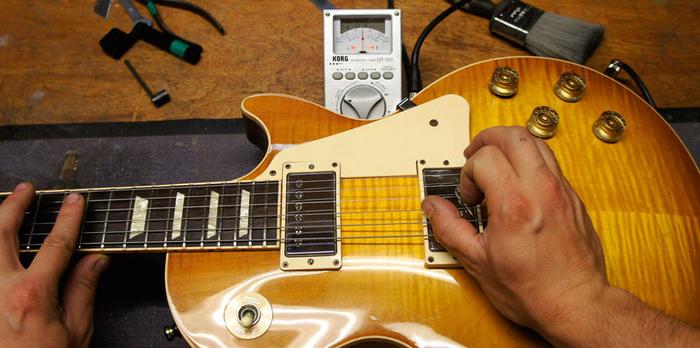
How can you ensure that everything is working correctly before putting your guitar back together? In my experience with DIY guitar projects, testing your work is a non-negotiable step in the process of wiring an Epiphone Les Paul. This is where potential future headaches are nipped in the bud. Before reassembling your guitar, I meticulously check each connection with a multimeter, validating continuity and ensuring there are no shorts. I also plug the guitar into an amp, carefully listening for any unexpected hums that might indicate a grounding issue. By methodically testing at this stage, you transform the art of wiring into a precise science, helping to ensure a flawless final result.
Common Mistakes and Troubleshooting
Having taken my fair share of missteps while diving into guitar wiring, I’ve come to value the hard-earned lessons along the way. What are the most frequent wiring mistakes guitarists make, and how can you avoid them? Allow me to offer insights gleaned from my hands-on experience that might save you both time and frustration.
One common pitfall I’ve encountered is not planning the layout before starting. I remember the first time I wired my Epiphone Les Paul; I was too eager to dive in, and I ended up with a tangled mess that seemed impossible to resolve. To avoid this, always map out your wiring diagram and visualize each connection point before soldering even a single joint.
Misjudging wire lengths can also lead to complications. Cutting wires too short might leave you stretching components beyond their limits, while excessively long cables create unnecessary clutter that can interfere with performance. I learned, though sometimes painfully, that measurements need to be precise from the get-go.
Another issue to watch for is cold solder joints. These are often the unsuspecting culprits of electrical issues, causing intermittent failures and frustrating noise. Ensuring your soldering iron reaches optimal temperature will create clean, reliable connections.
Through trial and error, I discovered that meticulous care combined with patience is paramount for avoiding these hurdles. With every mistake, there’s an opportunity to deepen understanding—embrace it as part of the wiring journey.
FAQs
What are the benefits of rewiring my Epiphone Les Paul?
What tools do I need to rewire my Epiphone Les Paul?
Is rewiring a guitar difficult for beginners?
What types of modifications can I do when rewiring?
Will rewiring my guitar affect its resale value?
Conclusion
Is wiring your guitar truly a DIY project, or is it an art form in itself? As I explored the nuances of wiring my Epiphone Les Paul, I realized it’s a mix of both. The summary of wiring techniques I’ve shared highlights the intricacies and satisfaction of every connection. Embracing the learning process, akin to my journey in lutherie, is key. I encourage you to dive into this project, armed with encouragement for DIY projects and the understanding that mistakes are part of the learning path. With patience and practice, wiring can transform from a task to an art form — a deeply rewarding experience.
R.M. Mottola, an engineer-turned-luthier, revolutionizes stringed instrument design with his deep focus on acoustics and ergonomics since 1994. As editor of the Savart Journal and a key contributor to American Lutherie, Mottola merges science with artistry in lutherie. He enriches the field with his extensive knowledge, shared through his Liutaio Mottola website, making him a beacon in the world of modern instrument craftsmanship.