If you’ve ever fiddled with your compressor pedal only to end up with a lifeless, squashed tone or a barely-there effect that does nothing for your dynamics, you’re not alone. Guitar compression can be a tricky beast: too much and you lose the natural expressiveness of your playing; too little and your tone lacks polish and consistency. But when understood and dialed in just right, guitar compression becomes a powerful ally that shapes your tone and playing dynamics, making your sound tighter, punchier, and more professional. As a seasoned professional guitarist and gear enthusiast, I’ve spent years experimenting with compression pedals and understanding their nuances—not just from a technician’s standpoint, but from the perspective of a player who wants usable, musical results. This article is written for the practical player: you’ll find actionable, real-world advice to help you master compression for guitar, with clear settings and tips for different musical contexts.
Key Takeaways
- Compression is like seasoning — used tastefully, it enhances tone without overpowering it. Understand compression’s subtle role and avoid heavy-handed settings.
- Different playing contexts (clean, dirty, lead, rhythm) require tailored compressor settings. Gain practical guidance for applying compression across styles.
- Experimentation and understanding your gear are key to finding your unique compression sound. Build confidence to personalize your compression approach.
Compression as the Secret Sauce for Clean and Edge-of-Breakup Tones
Compression is often called the “secret sauce” for clean guitar tones, especially in styles like funk, country, and pop where note consistency and articulation are crucial. When used correctly, a compressor pedal smooths out uneven picking dynamics and adds a sense of glue that holds your notes together without altering the natural character of your guitar tone. Think of compression as seasoning in cooking: it enhances the flavor without overpowering the dish.
For clean and edge-of-breakup tones, start with a higher compression ratio (around 4:1 to 6:1) and a fast attack time. This setting is great for percussive, snappy playing styles like chicken picking in country music, where you want each note to have a consistent attack and sustain. The fast attack clamps down on the initial transient, evening out the dynamic spikes from your picking hand.
In funk or bell-like Stratocaster tones, a moderate compression ratio (2:1 to 4:1) with a medium attack time works wonders. This allows the compressor to smooth dynamics and add sustain without squashing the natural pick attack, preserving the lively, chimey quality of the guitar. Use the makeup gain control to balance the volume after compression so your signal feels natural and doesn’t jump out or get lost in the mix.
Compression in this context acts like a subtle glue, binding your notes together and making your clean tone sound polished and professional. It’s all about enhancing your playing, not masking it. For those interested in diving deeper into how compressor pedals work and how to tailor settings for your unique sound, the Ultimate Guide to Compressor Pedals: Everything You Need to Know is an excellent resource that covers everything from basics to advanced techniques.
Video tutorial: How to use a compressor pedal effectively
Tightening Up Dirty Tones: Using Compression with Overdrive
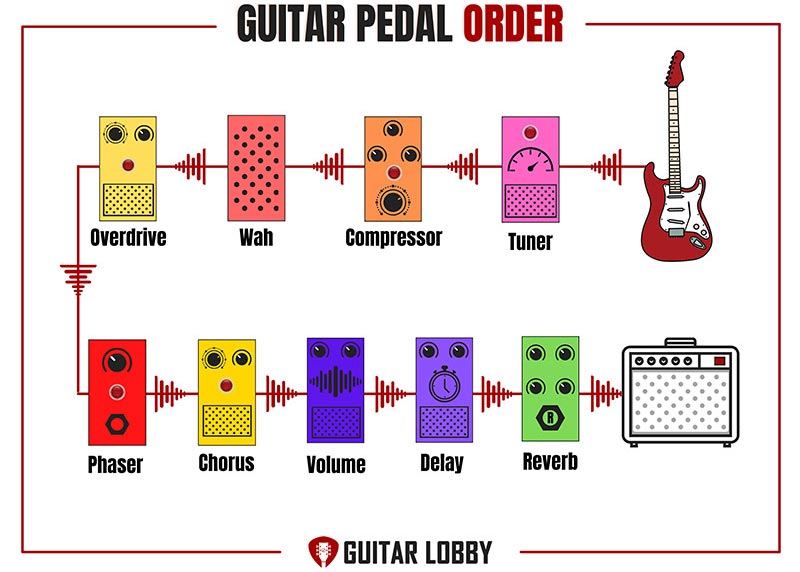
When it comes to distorted or overdriven tones, compression plays a different but equally important role. Uneven picking dynamics can cause volume spikes or lost articulation, especially with gain pedals involved. Where you place your compressor in the signal chain—before or after your dirt pedals—makes a significant difference. For those looking to deepen their understanding of how compression shapes guitar tone and dynamics, understanding guitar compression: a beginner’s guide offers an excellent, in-depth exploration of these principles.
In-depth guide to dialing in compressor and drive pedals for guitar tone
Compression Before Overdrive

Placing your compressor before your overdrive pedal smooths out input dynamics, preventing sudden volume jumps that can make your distortion sound wild or uncontrolled. This is especially helpful if you have an aggressive picking style or want a consistent dirt tone. The compressor acts like a volume traffic cop, directing the signal flow smoothly into the gain stage. For those interested in mastering the nuances of guitar compression and how it shapes your tone, A Brief but Complete Guide to Guitar Compression – Anatomy of Tone offers an in-depth look into the technique and its impact.
Understanding compressor placement: before or after overdrive?
Compression After Overdrive
Placing the compressor after your dirt pedals offers precise control over volume consistency without losing the dynamic expression of your playing. This “surgical” compression is excellent for lead lines where you want every note to cut through clearly without being swallowed by distortion. It helps keep fast passages articulate and clean, even with heavier gain settings.
Keep in mind that compression can also increase noise levels when placed after high-gain pedals, so noise gating or careful gain staging might be necessary. Experiment with placement and settings to find the sweet spot that suits your rig and style. To explore more innovative techniques and fully harness your compressor pedal’s potential, check out Five Creative Ways to Use a Compressor Pedal for Guitar for inspiration and expert tips.
Video tutorial: Compressor Placement Relative to Overdrive
Sustained Leads Without Saturation: Compression Techniques for Expressive Playing

One of the most rewarding uses of guitar compression is achieving long, singing sustain for lead playing without resorting to heavy distortion. Compression boosts the tail end of notes and controls transients, allowing notes to ring out longer and more evenly. This is especially valuable for expressive solos where dynamics and articulation remain important.
For sustained lead tones, use a lower compression ratio (around 2:1 to 3:1) with a low threshold to engage compression gently. Set a longer attack time so the initial pick attack isn’t squashed—this preserves note clarity and prevents a lifeless sound. The release time can be adjusted to taste, but a slightly longer release helps maintain smooth sustain without pumping.
This approach keeps your playing expressive, allowing subtle dynamic shifts to come through while extending note sustain naturally. Compression here acts like a gentle hand holding your notes longer without squeezing them too hard or choking the life out of them.
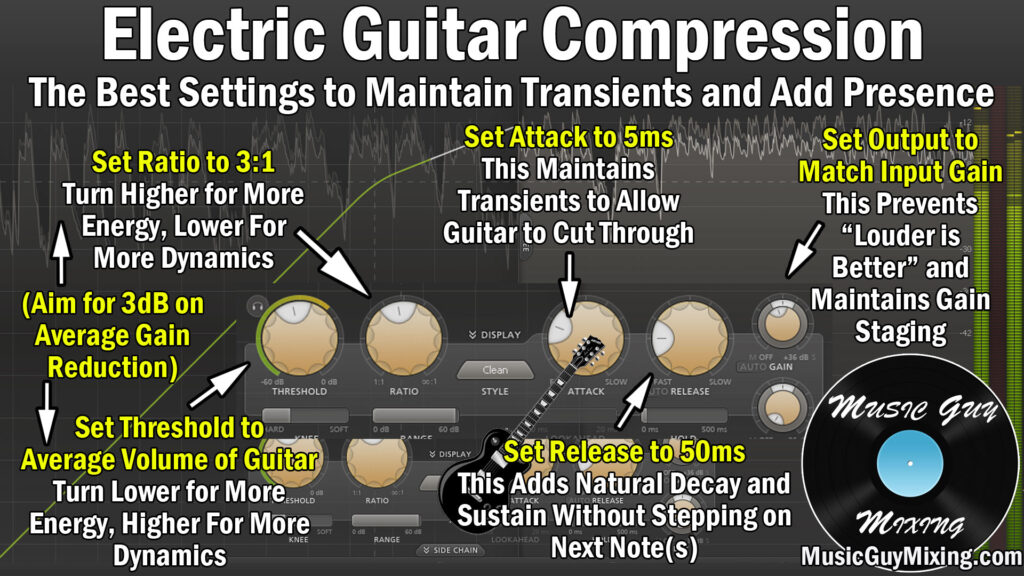
Using compression this way lets you maintain articulation and dynamic expression even at lower gain levels, perfect for blues, jazz, and clean lead styles where clarity and sustain are paramount. For a deeper dive into how different compression settings affect electric guitar tones and detailed step-by-step guidance on mastering these techniques, check out the Electric Guitar Compression Guide – Music Guy Mixing.
Video tutorial: Compressor Pedal Best Uses for Guitar Sustain
Rhythm Precision: Compression as Your Timing Assistant

Compression is also invaluable for rhythm guitarists aiming to tighten their playing and maintain consistent chord volumes. In groove-based styles like funk, pop, and gospel, even chord attack and sustain help lock in the rhythm section and create a compelling groove.
Compression evens out the attack and sustain of your chords, smoothing out strumming inconsistencies and helping your timing feel steadier. Subtle compression is key here; it should support the groove without sounding obvious or squashed.
Don’t be afraid to push your compressor’s controls beyond typical settings during practice to hear extremes. This experimentation helps you understand how each knob affects your tone and dynamics, allowing you to dial back to a subtle, musical setting that enhances your rhythm playing.
Think of compression as a metronome’s partner, helping your rhythm stay steady and tight by controlling the volume envelope of your chords and notes. This tightness translates directly into a more professional, polished performance. For those looking to deepen their understanding, understanding guitar compression: a beginner’s guide – iZotope offers an excellent, comprehensive overview to help you get the most out of your compressor.
Video tutorial: How To Compress A Guitar
Making It Your Own
Compression is a versatile tool that, when understood and personalized, can make your guitar playing easier and your tone more polished. The key is to know what effect you want before you start tweaking knobs. Are you after tighter rhythm chops? Singing lead sustain? Clean tonal glue? Each goal requires a slightly different approach to compression pedal settings.
Remember, there’s no one-size-fits-all setting for guitar compression. Your guitar, amp, playing style, and musical context all influence how a compressor should be dialed in. The best approach is to experiment boldly, trust your ears, and use the practical tips here as a starting point to find your unique sound.
Ready to transform your tone and dynamics? Apply these tips, experiment with your compressor pedal, and discover the natural, expressive sound that fits your style and gear.
Have a favorite compression setting or a challenge you’ve faced with compression for guitarists? Share your experiences in the comments below to help build a community of practical players mastering their tone.