The moment my pencil touched the paper, I realized drawing a bass guitar was more than just sketching an instrument—it was capturing the soul of music itself. As a luthier with decades of experience, I’ve crafted countless stringed instruments, but translating their essence onto paper presented a unique challenge. What if I told you that mastering the art of drawing a bass guitar could deepen your understanding of music and design in ways you never imagined? In this bass guitar drawing tutorial, I’ll share the secrets I’ve gleaned from years of studying every curve, line, and detail of these magnificent instruments. Whether you’re an aspiring artist, a music enthusiast, or simply curious about the intricate world of bass guitars, this guide will transform your perspective and unleash your creative potential. Let’s embark on this artistic journey together, where each stroke of your pencil brings you closer to the heart of bass guitar craftsmanship.
Understanding the Bass Guitar’s Structure
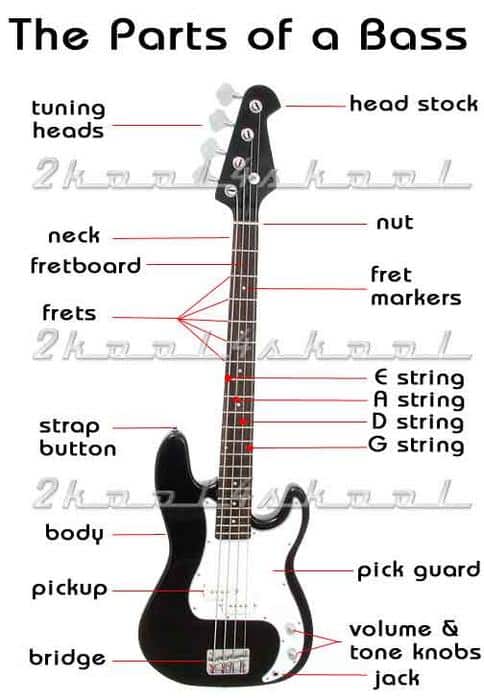
Basic Components of a Bass Guitar
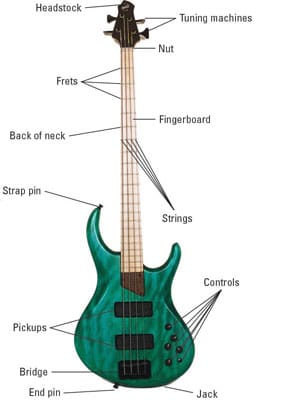
As a researcher in instrument acoustics, I’ve come to appreciate the intricate interplay of components that make up a bass guitar. When creating a bass guitar outline drawing, understanding these elements is crucial. The body, typically made of wood, forms the guitar’s core and greatly influences its tone. The neck, extending from the body, houses the fretboard where notes are played. At the top, you’ll find the headstock with tuning pegs for adjusting string tension. Bridge and pickups on the body are vital for sound production and amplification. Each string, stretching from the bridge to the headstock, vibrates to create the bass’s signature deep tones. Recognizing these components and their relationships is essential for accurately depicting a bass guitar in your artwork, capturing not just its form, but its essence.
Analyzing the Bass Guitar’s Shape
As I analyze the bass guitar’s shape for my sketch, I’m reminded of the ergonomic considerations that influence its design. The instrument’s contours aren’t just aesthetic choices; they’re purposeful adaptations for player comfort and sound production. The body’s curves, for instance, allow it to rest comfortably against the musician’s torso, while the cutaways provide easy access to higher frets. These nuances are crucial to capture in a bass guitar sketch.
My experience in instrument design has taught me that the shape also affects tonal qualities. The wood’s resonance varies depending on body thickness and contours. When drawing, I pay close attention to these subtle variations, as they contribute to the instrument’s character. Understanding these functional aspects not only improves the accuracy of your sketches but also deepens your appreciation for the bass guitar’s intricate design.
Preparing Your Drawing Materials

As I unpack my art supplies, I can’t help but feel a surge of excitement. The secret to a great bass guitar drawing often lies in the tools you choose. Are you ready to discover the perfect arsenal for your artistic journey? Over the years, I’ve experimented with countless materials to draw a bass guitar for beginners, and I’ve narrowed it down to a few essentials that truly make a difference.
First and foremost, invest in a set of high-quality graphite pencils. I prefer a range from 2H to 6B to capture both fine details and bold lines. A kneaded eraser is indispensable for lifting graphite and creating highlights. For precise outlines, I always keep a mechanical pencil handy. Don’t forget a sturdy sketchbook with smooth, heavyweight paper that can withstand multiple erasures and layering.
To add depth and dimension, I recommend a set of blending stumps and a soft chamois cloth. These tools will help you achieve those smooth transitions that bring a bass guitar to life on paper. Remember, the right materials can elevate your drawing from good to extraordinary, making your artistic journey both rewarding and enjoyable.
Step-by-Step Bass Guitar Drawing Process
Sketching the Basic Outline
In my years of instrument design, I’ve learned that a simple bass guitar drawing begins with a solid foundation. Let’s start by sketching the basic outline. I’ll guide you through capturing the essence of the bass guitar’s shape, ensuring proportions are accurate from the start. Begin with light, loose strokes to define the body’s contours. Don’t worry about perfection yet; we’re laying the groundwork for details to come.
Next, we’ll establish the neck’s position and rough out the headstock. Remember, the neck-to-body ratio is crucial for authenticity. As we progress, I’ll share tips on achieving balance and symmetry, drawing from my experience in creating precise technical drawings. This initial outline is your roadmap, guiding every subsequent step in our bass guitar illustration journey.
Adding Details to the Body

Now that we’ve sketched the basic outline, it’s time to breathe life into our bass guitar drawing by adding details to the body. As an engineer turned luthier, I’ve learned to appreciate the subtle nuances that make each instrument unique. In this crucial step of our bass guitar drawing guide, we’ll focus on incorporating these distinctive features.
I’ll show you how to add the pickup cavities, bridge, and control knobs with precision. We’ll also define the body’s contours, emphasizing the sleek curves and ergonomic design that are hallmarks of a well-crafted bass. Remember, it’s these details that transform a simple sketch into a realistic representation. As we progress, I’ll share insider tips on how to capture the authentic look and feel of different bass guitar models, drawing from my hands-on experience in crafting these instruments.
Drawing the Neck and Headstock

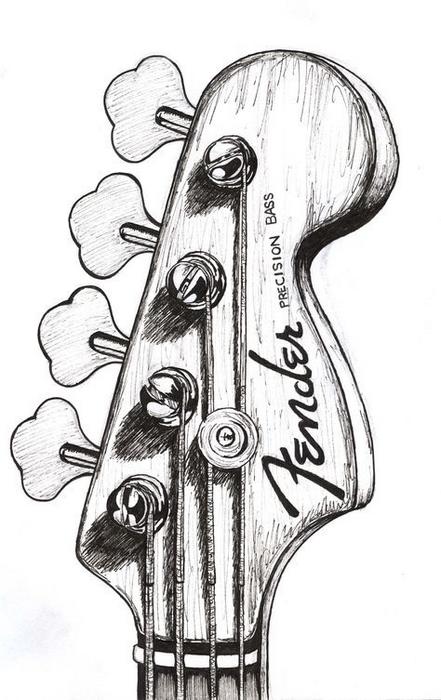
Now, let’s focus on drawing the neck and headstock, crucial elements in how to draw a bass guitar. My research into instrument acoustics has taught me that these components are vital for both sound production and visual balance. As I sketch the neck, I pay close attention to its proportions, typically making it about 2/3 the length of the body. The headstock’s shape varies between brands, so I always reference my chosen model. I’ve found that accurately depicting the subtle curve where the neck meets the body can really elevate your drawing.
When adding frets, I use a ruler to ensure even spacing. Don’t forget to include the nut at the top of the neck and the bridge at the body end. These small details make a big difference in the realism of your bass guitar drawing. Remember, the neck and headstock are where much of the instrument’s character lies, so take your time to capture their unique features.
Including Strings and Hardware
Now, let’s bring our bass guitar drawing to life by adding strings and hardware. As I’ve explored in my American Lutherie journal contributions, these elements are crucial for realism. To learn to draw a bass guitar accurately, we must pay attention to these details. I’ll guide you through placing the bridge, tuning pegs, and pickups precisely where they belong. The strings are particularly important – they should run parallel from the bridge to the nut, with a slight curve over the fretboard. Remember, the thickness of the strings varies, with the E string being the thickest. Adding these components not only enhances the drawing’s authenticity but also demonstrates your understanding of the instrument’s functionality. Let’s make your bass guitar come alive on paper!
Refining Your Bass Guitar Drawing
Adding Shading and Texture
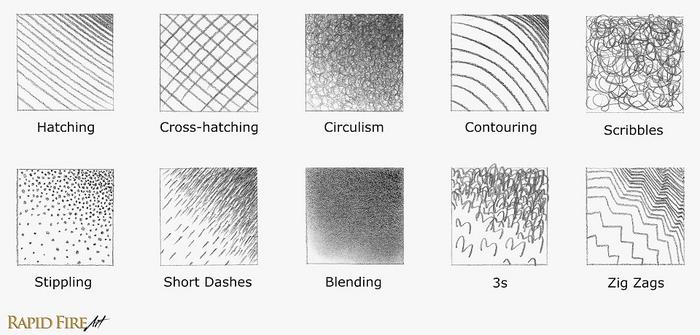
Now that we’ve outlined our bass guitar art, it’s time to bring it to life with shading and texture. My work in instrument acoustics has given me a deep appreciation for the tactile qualities of bass guitars, and I’m excited to share how to translate these into your drawings. Start by identifying the light source and applying subtle shadows to create depth. Pay attention to the wood grain patterns on the body and neck – these subtle details can make your drawing pop. For metallic hardware, use short, precise strokes to capture the reflective qualities. Don’t forget the strings; alternating between light and dark lines can create the illusion of roundness and tension. Remember, patience is key here. Layering your shading gradually will result in a more realistic and nuanced representation of your bass guitar.
Incorporating Color (Optional)

As a luthier, I’ve seen how color can breathe life into a bass guitar drawing. While optional, incorporating color can elevate your artwork to new heights. Choose your palette carefully, considering the wood types and finishes commonly used in bass guitar construction. For a natural look, opt for warm browns and subtle grain patterns. If you’re aiming for a more vibrant design, consider bold solid colors or eye-catching sunbursts. Remember, the finish affects the overall appearance – glossy for a sleek look, or matte for a vintage feel. Apply colors in layers, starting with base tones and gradually building up to highlights and shadows. This technique adds depth and realism to your bass guitar drawing with pictures. Don’t forget to include reflections on metal hardware for that extra touch of authenticity.
Tips for Improving Your Bass Guitar Drawings

As the editor of the Savart Journal, I’ve encountered numerous approaches to representing stringed instruments. I’ll share some of the most effective techniques I’ve discovered for improving your bass guitar drawings. First and foremost, observation is key. Spend time studying real bass guitars, noting the subtle curves and proportions that make each model unique. This attention to detail will elevate your drawings from good to great.
What if I told you there were secret techniques used by professional instrument illustrators? Get ready to unlock these hidden gems. One such technique is the use of grid lines to maintain proper proportions. By dividing your reference image and drawing paper into equal sections, you can accurately transfer the bass guitar’s shape and details. This method is particularly helpful for achieving an easy bass guitar drawing that still looks professional.
Another tip I’ve learned is to focus on negative space. Instead of solely concentrating on the guitar itself, pay attention to the areas around it. This approach can help you capture the instrument’s silhouette more accurately. Additionally, practice drawing from different angles. A bass guitar’s form changes dramatically when viewed from various perspectives, and mastering these views will greatly enhance your skills.
FAQs
What are the basic steps to draw a bass guitar?
To draw a bass guitar, follow these basic steps:
- Sketch the body shape
- Add the neck and headstock
- Draw the strings and frets
- Include the bridge and pickups
- Add details like tuning pegs and control knobs
- Refine the outline and add shading
What tools do I need to draw a bass guitar?
To draw a bass guitar, you’ll need:
- Pencil (HB or 2B)
- Eraser
- Drawing paper
- Ruler for straight lines
- Reference images of bass guitars
- Optional: Fine-tip pen for outlining
How do I accurately draw the proportions of a bass guitar?
To accurately draw the proportions of a bass guitar:
- Use reference images for guidance
- Start with basic shapes to outline the body and neck
- Measure and compare the ratios of different parts (e.g., body to neck length)
- Use light sketch lines to adjust proportions before finalizing
- Pay attention to the scale length and fret spacing
- Double-check your drawing against reference images throughout the process
What are some common mistakes to avoid when drawing a bass guitar?
Common mistakes to avoid when drawing a bass guitar include:
- Incorrect body shape or proportions
- Misaligned or unevenly spaced frets
- Unrealistic string tension or alignment
- Forgetting important details like the nut or bridge
- Improper placement of pickups or control knobs
- Neglecting the proper curvature of the neck
- Overlooking the headstock shape and tuning peg arrangement
How can I add realistic details to my bass guitar drawing?
To add realistic details to your bass guitar drawing:
- Study reference images closely for intricate parts
- Add wood grain texture to the body and neck
- Include reflections on metal parts like pickups and bridge
- Draw accurate fret markers and inlays
- Show string windings on tuning pegs
- Add subtle shadows and highlights for depth
- Include small details like screws and pickup pole pieces
- Pay attention to the finish (glossy, matte, etc.) when shading
Conclusion
Ready to strike a chord with your bass guitar drawings? Let’s recap your journey and set you on the path to artistic mastery. Throughout this bass guitar drawing tutorial, we’ve explored every curve and contour of this iconic instrument. From understanding its structure to mastering the intricate details, you’ve gained the skills to bring a bass guitar to life on paper.
As a member of the New England Luthiers group and a passionate advocate for the science and art of instrument making, I hope this guide has inspired you to explore the fascinating world of bass guitars through your drawings. Remember, each stroke of your pencil is a step towards perfection. Practice regularly, experiment with shading and color, and soon you’ll be creating bass guitar masterpieces that resonate with viewers. Your artistic journey doesn’t end here – it’s just the beginning of a harmonious blend of music and art. Keep drawing, keep improving, and most importantly, keep enjoying the process!