Imagine picking up your beloved Gibson Les Paul, and as you glide your fingers along its neck, something feels off. It’s moments like these that have taught me, after decades in lutherie, that understanding your instrument is key to mastery. Today, I’ll delve into the vital aspect of truss rod adjustment—an essential part of guitar setup—which I’ve seen transform a Les Paul’s performance in unexpected ways. Ever wonder why your Les Paul’s playability changes over time or what that subtle buzz is all about? A crucial, yet often overlooked, player in this is the truss rod. In this guide, I’ll share with you how mastering this adjustment can rectify problems and enhance your playing experience. My journey with these iconic guitars has shown that knowing when and how to adjust the truss rod can make all the difference. Let’s explore this together, unlocking new potential in your instrument.
What is a Truss Rod?
Did you know that most modern guitars are equipped with a truss rod designed to manage neck curvature? This fascinating piece of engineering plays a crucial role in the integrity and playability of your beloved Gibson Les Paul. As an engineer turned luthier, I appreciate the intricate design and purpose behind the truss rod. It’s essentially a metal rod installed inside the guitar neck, running the length of the fretboard.
My journey into the world of guitar craftsmanship deepened my understanding of how varied environmental factors, like humidity and temperature, affect the wooden neck. The truss rod serves as a form of insurance, allowing us to make precise adjustments to counter these effects. This small but mighty component can be a game-changer. Without it, even a slight bow or warp could render a guitar virtually unplayable.
In my workshops, I often encounter musicians struggling with unwanted buzzing or unusually high action. It’s moments like these when understanding the truss rod comes into play. By adjusting this rod, one can align the neck’s curvature to its optimal state, ensuring superior playability and sound quality. Through years of hands-on experience, I’ve seen how a well-adjusted truss rod can bring out the best in an instrument.
Why Adjust the Truss Rod?
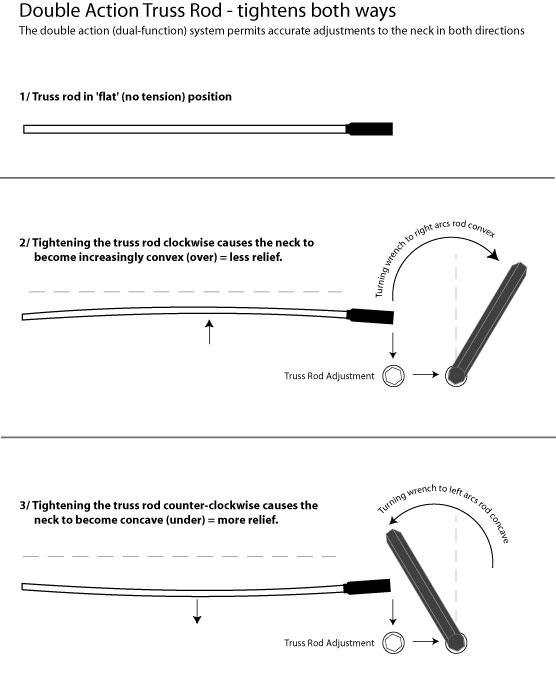
Importance of Neck Relief
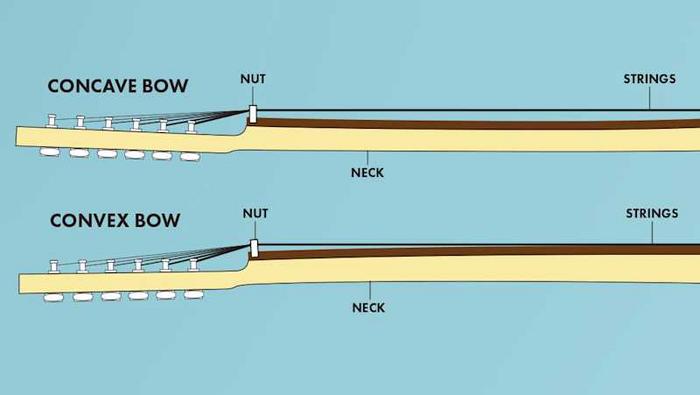
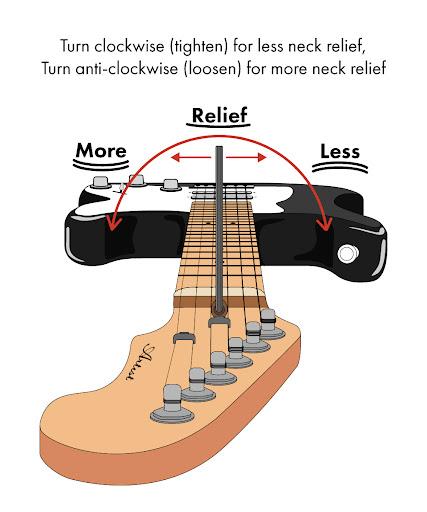
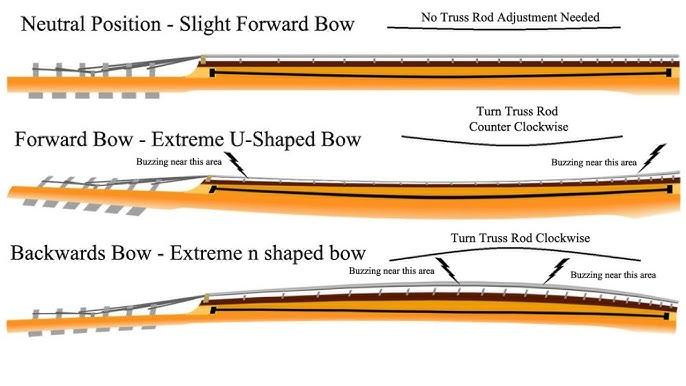
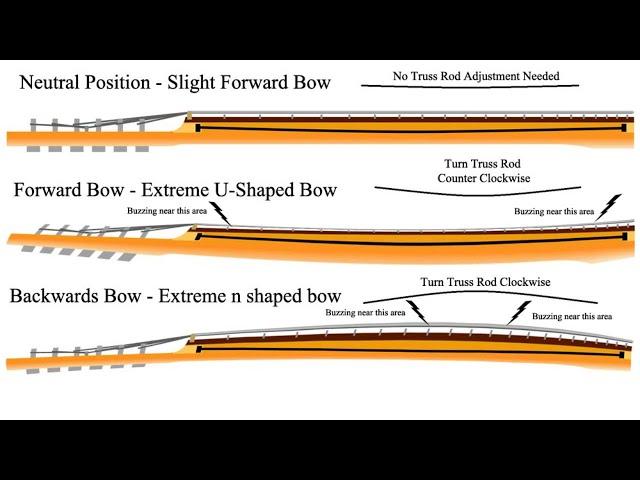
What if I told you that neck relief is just as essential as string gauge for your guitar’s sound? In my experience, achieving the right neck relief can enhance not only playability but also tonal quality. Neck relief pertains to the slight forward curve of the guitar neck. This curvature is critical because it influences string action—the height of the strings above the fretboard—which in turn affects both ease of play and sound clarity. An optimal neck relief ensures that your Les Paul provides the best possible playing experience, striking a balance between minimizing fret buzz and maintaining clear, ringing notes. When adjusting the truss rod, understanding the importance of neck relief is paramount. It is a vital aspect of guitar care that can prevent future issues and save you from inconvenient repairs. Therefore, adjusting it correctly ensures not just mechanical stability but also the rich, resonant tone your Gibson Les Paul is known for.
Benefits of Proper Adjustment
Imagine playing a guitar that feels effortless to play and stays in tune—this is the power of truss rod adjustment. When carried out correctly, this simple yet crucial task can dramatically enhance your guitar setup’s precision, making your Les Paul not only more comfortable to play but also more reliable. Proper adjustment of the truss rod directly influences the action height, which is the distance between the strings and the fretboard. By finding that perfect balance, you unlock the potential of your instrument.
I’ve had countless players come to me, their instruments nearly unplayable due to poorly adjusted truss rods. Once corrected, they’re amazed at the transformation. A properly adjusted truss rod means improved neck relief, offering smoother playability and minimizing fret buzz — a common yet avoidable issue. Understanding this as a guitar tech has given my work deeper purpose. I’ve seen first-hand how these adjustments not only resolve issues but also enhance a player’s connection to their instrument, making practice a more joyful experience.
When to Adjust the Truss Rod?
Did you know that seasonal changes can affect the optimal tension in your guitar neck? As someone who has spent countless hours fine-tuning my Gibson Les Paul, I’ve learned that understanding when to adjust the truss rod is crucial for maintaining its performance and tone. It’s not just about fixing problems; it’s about preventing them. Being aware of environmental factors can help you act preemptively in guitar maintenance, ensuring your Les Paul stays in top shape year-round.
The truss rod is a key player in this equation. When the weather shifts, the wood in your guitar neck expands or contracts, altering the neck’s bow. You’ll want to adjust the truss rod when you notice changes in string action, fret buzz, or tuning stability. For me, the signs are subtle—my ear can detect a shift in harmony, and my fingers feel the difference in string tension. These are my cues to assess and adjust, ensuring my guitar always responds with optimal playability and sound. By being proactive, you can maintain that sweet spot where your Les Paul sings, regardless of the season.
Who Can Adjust the Truss Rod?
Is your guitar in the hands of the right expert for adjustments? This question isn’t just rhetorical—it’s a crucial part of ensuring your beloved Gibson Les Paul plays like a dream. From my personal journey with acoustic and electric setups, I’ve learned that choosing the right technician can mean the difference between a good setup and a great one. Armed with years of hands-on experience, I can attest that not everyone who claims to adjust a truss rod truly understands its nuances.
I’ve seen players opt for DIY fixes, while others rely on local shops or trusted luthiers. If you don’t have the skills or confidence, an experienced technician is your champion. Their expertise not only ensures optimal neck relief but also preserves your instrument’s integrity. However, even as someone immersed in the world of guitars, I recognize how essential it is to find professionals who treat each adjustment as a craft. The right expert possesses not just technical know-how but also an intuitive understanding of the instrument’s unique voice. Entrusting your Les Paul to someone who respects its craftsmanship as much as you do is indispensable for your perfect tonal journey.
How to Adjust the Truss Rod
Tools Needed
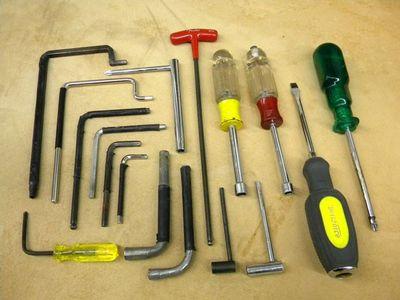
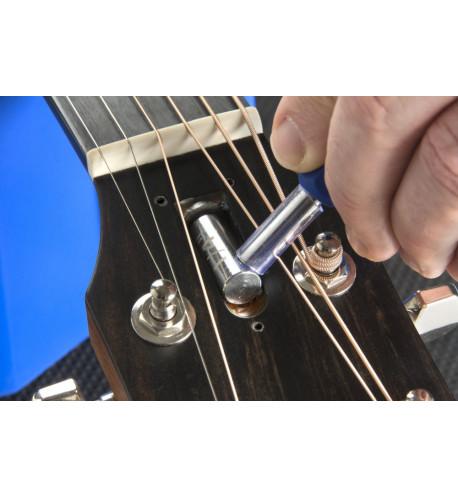
What essential tools do you need to ensure a successful truss rod adjustment? As someone deeply entrenched in guitar maintenance and repair, I can tell you firsthand that having the right arsenal makes all the difference. To adjust a Gibson Les Paul’s truss rod, you’ll need a truss rod wrench, ideally a 5/16″ size for Gibson guitars. A reliable tuner is crucial for ensuring the accuracy of your adjustments, while a capo and feeler gauge help measure neck relief precisely. Each of these truss rod tools plays a critical role in achieving the balance and playability you desire, turning what might feel like an intimidating task into a straightforward operation.
Step-by-Step Adjustment Process
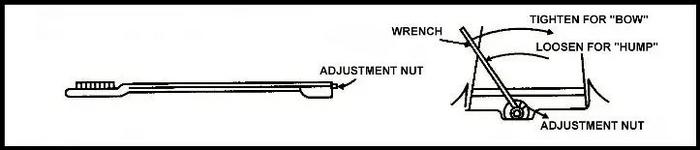
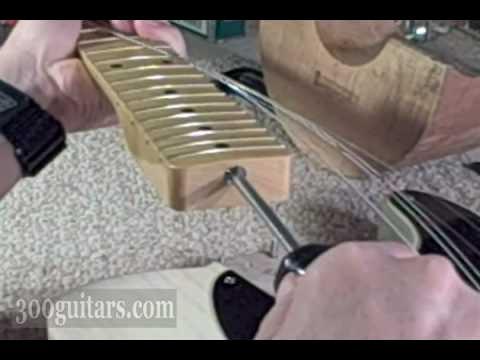
Are you ready to uncover the process behind achieving perfect neck relief? In the realm of guitar setup, understanding the step-by-step adjustment process of the truss rod is pivotal. When I approach adjusting a Gibson Les Paul, my focus is not only on altering neck tension but also on achieving a harmonious balance that transforms playability. Each guitar has its unique personality, and a thoughtfully executed adjustment can significantly enhance this character.
Following a consistent process demystifies truss rod adjustments. My journey with guitars has taught me that systematically addressing each step leads to stable outcomes. I recommend beginning by assessing the neck’s current state and identifying the adjustment needed. Gradually turn the truss rod nut, making small incremental changes, and frequently test the feel and sight of the neck relief as you proceed. This precision ensures that every adjustment aligns with the guitar’s inherent response and optimizes the setup. As you fine-tune, awareness, patience, and practice will ultimately yield a well-adjusted guitar, transforming both its sound and your playing experience.
Testing Your Adjustment
How do you truly know if your truss rod adjustment was a success? Evaluating your adjustments ensures that your guitar not only plays well but also holds its tune. After each tweak, I meticulously test the adjustment to confirm that the changes align with my intended improvements in string action and tuning stability. This process is a critical component of ensuring the optimal performance of a Gibson Les Paul.
First, I examine the distance between the strings and the fretboard to ensure the action is neither too high nor too low, as this can impact playability. With this, I’m also looking for any unexpected changes in the tuning stability, which might suggest an improper adjustment. My experience has taught me that sometimes subtle shifts in neck relief can make a profound difference. This level of attention not only preserves the intonation but also prolongs the guitar’s lifespan, providing a responsive and enjoyable playing experience.
Common Mistakes to Avoid
Could a simple oversight in adjustment lead to lasting damage to your instrument? This is a question I’ve pondered many times throughout my career. With careful attention and experience, many common pitfalls can be easily avoided. I’ve learned from my early days of tinkering with truss rods and can tell you that the consequences of not paying attention can be costly. One of the most prevalent mistakes I see is over-tightening the truss rod. It’s tempting to keep turning, hoping for that perfect neck relief, but this can irrevocably damage your Gibson Les Paul’s neck.
Another common oversight is neglecting to regularly check the neck’s relief. Guitar necks react to changes in temperature and humidity, and understanding this can save you from future headaches. I remember assuming that once set, the neck relief would remain constant. How wrong I was! Regular checks can prevent unexpected issues down the road.
Finally, not using the right tool is a mistake that can lead you astray. Ensure you have the correct wrench size specifically designed for Gibson Les Pauls. It’s a precise instrument that deserves precise adjustments. Having this knowledge has helped me, and by sharing it, I hope to set you on the path to perfecting your guitar’s playability without the pitfalls I once faced.
FAQs
What is a truss rod and why is it important for a Gibson Les Paul?
How do you know if your Gibson Les Paul needs a truss rod adjustment?
What tools do you need to adjust the truss rod on a Gibson Les Paul?
How do you safely adjust the truss rod on a Gibson Les Paul?
Should you attempt to adjust the truss rod on your own?
Conclusion
Are you ready to take your guitar maintenance skills to the next level? Mastering the art of truss rod adjustment on your beloved Gibson Les Paul isn’t just about handling minor tweaks—it’s a commitment to guitar care that offers a richer playing experience. Throughout this guide, I’ve shared my personal insights on not just why you should adjust the truss rod, but also when and how to execute this essential task with precision. From understanding the criticality of neck relief to identifying the opportune moment for adjustments, the steps are detailed here to empower you. Armed with the right tools and knowledge, you can prevent common mistakes and maintain your guitar’s optimal performance. Embracing regular adjustments can lead to a much more satisfying playing experience. With practice, patience, and care, you’ll find that this hands-on approach not only preserves your instrument but also deepens your connection with it.
R.M. Mottola, an engineer-turned-luthier, revolutionizes stringed instrument design with his deep focus on acoustics and ergonomics since 1994. As editor of the Savart Journal and a key contributor to American Lutherie, Mottola merges science with artistry in lutherie. He enriches the field with his extensive knowledge, shared through his Liutaio Mottola website, making him a beacon in the world of modern instrument craftsmanship.