Imagine the moment when a beloved guitar’s rich harmony is suddenly dampened, its tone wavering just enough to unsettle a practiced ear. For many, this is the point of profound change—when one learns the essential role of a guitar bridge clamp in resurrection. Dive into the world where precision meets passion, and discover how this unassuming tool can restore not just sound, but sentiment. With nearly three decades of experience in lutherie, I’ve witnessed how the right techniques and tools, such as a bridge clamp, can make the difference between discord and harmony in guitar bridge repair.
This guide will serve as your compass through the intricate landscape of clamping, explaining why and when employing a bridge clamp proves crucial. Beyond understanding usage and techniques, we’ll explore where to acquire these tools—ensuring you have the best at your fingertips to preserve the soul of your instrument. Let’s embark on this meticulous journey to mastery together.
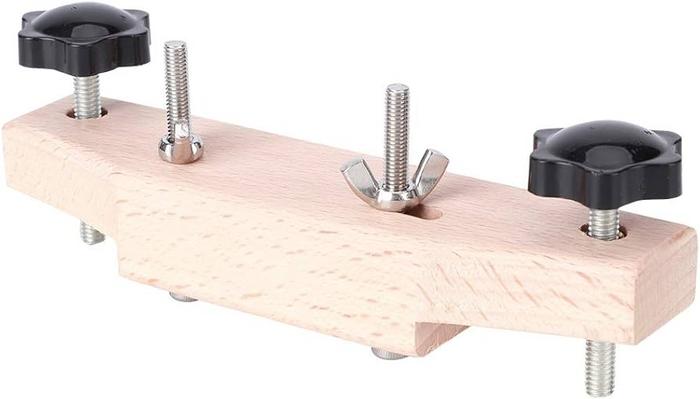
What are Guitar Bridge Clamps?
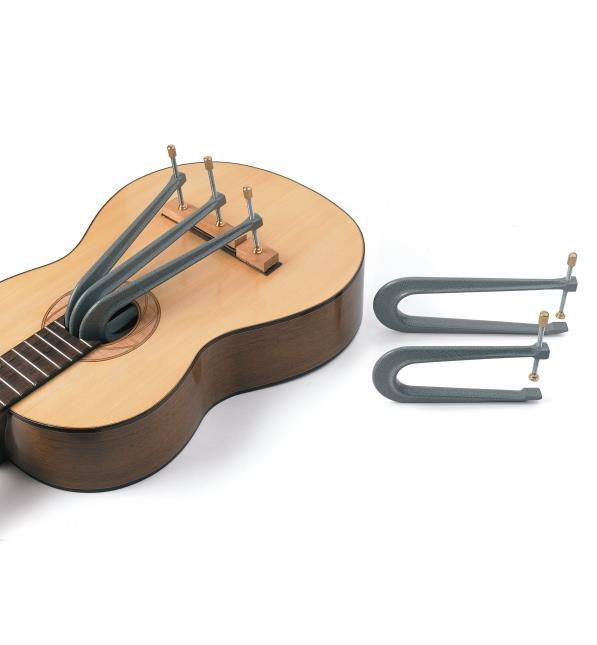
Have you ever wondered what makes a guitar bridge clamp different from any other clamp? As an engineer with a passion for instrument design, I can explain how specific features in guitar bridge clamps contribute to their effectiveness in protecting your instrument. From my own experience with guitar bridge repair, I’ve seen firsthand how these *specialized tools* prevent harmful tension and enhance the longevity of guitars.
At its core, a bridge clamp is a device designed to secure the bridge of a guitar while repairs or adjustments are being made, ensuring that no additional stress damages the instrument. Unlike standard clamps, which may exert uneven pressure leading to possible warping or cracking, guitar bridge clamps are meticulously engineered to provide *even force distribution*. This ensures that the tonal quality and structural integrity of the guitar remain uncompromised.
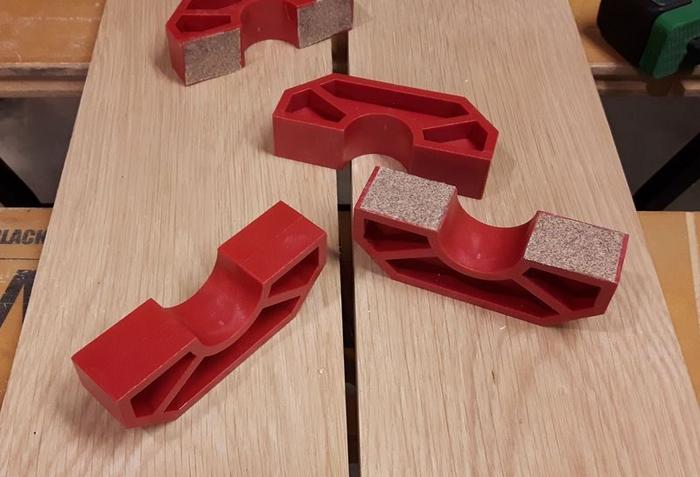
There are various types of guitar clamps available, each tailored for different requirements. Depending on factors like the specific material of the guitar or the design of the bridge, you might choose different clamp types. For instance, long-reach clamps are particularly useful for acoustic guitars with deeper bodies, while smaller, more precise clamps might be required for electric guitars.
In conclusion, guitar bridge clamps are indispensable for precise, reliable repairs and adjustments. Such techniques not only preserve the guitar’s craftsmanship but also enhance its musical capability, ensuring every strum delivers the perfect sound. As we further explore the advantages and applications of these tools in the following sections, you’ll discover just how pivotal a role they play in maintaining your guitar’s beautiful tone and structure.
Why Use a Guitar Bridge Clamp?
What if the secret to a longer-lasting guitar lies in how you handle its bridge? As someone who has immersed themselves deeply in the world of luthier tools and guitar repair techniques, I’ve come to realize that the guitar bridge clamp is an understated hero in the realm of guitar maintenance. My extensive research in lutherie has taught me that using a bridge clamp not only ensures a better repair but also enhances the player’s experience. The bridge supports the tension created by the strings, making its stability crucial for sound quality and structural integrity.
Having repaired numerous guitars, I’ve consistently found that a bridge clamp can effectively restore the correct alignment and secure the bridge in place with precision and finesse. This attention to detail has tangible benefits: enhanced sustain, improved intonation, and a more resonant sound. Moreover, properly clamped bridges are less prone to lifting over time, which directly translates to less frequent repairs and a more reliable instrument.
For guitar enthusiasts and professionals alike, embracing the bridge clamp is not merely a repair tactic but a proactive step in preserving the soul of the guitar. It represents both a technical and an emotional investment, nurturing the bond between musician and instrument.
Where to Purchase Guitar Bridge Clamps
Finding the right tools can be the difference between a good repair and a great one; but where do you start? This question resonates deeply for both budding enthusiasts and seasoned professionals. Throughout my years of sourcing materials, I’ve developed trustworthy connections with various suppliers that consistently offer high-quality guitar luthier supplies. Let me share some of these with you to ensure you find the best guitar bridge clamp available.
Online retailers like StewMac and Luthiers Mercantile have become go-to destinations, offering a vast array of specialized tools perfect for any repair job. Their user reviews and detailed descriptions help you make informed decisions, much like having a seasoned mentor by your side.
When seeking something even more specialized, don’t overlook local music shops. They often carry premium bridge clamps and can offer personalized advice. This face-to-face interaction is invaluable and can lead to discovering hidden gems. Leveraging these resources arms you with the tools needed to transform your repair work from good to great.
When to Use a Guitar Bridge Clamp?
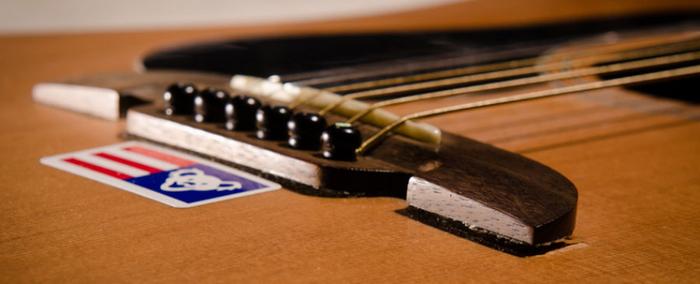
Are you ready to learn the tell-tale signs that it’s time to reach for your bridge clamp? In my experience, recognizing these indicators before they become severe can save a lot of time and cost in guitar repairs. The need for a guitar bridge clamp often arises when there’s an issue with the gluing of the guitar bridge, particularly in acoustic guitar bridges. Over time, the bridge may start to lift or become loose due to changes in humidity, tension from the strings, or simply age.
One crucial sign is if you notice a gap forming between the bridge and the body of your guitar. This can lead to issues with sound quality and playability. Addressing this early by applying a bridge clamp can ensure the bridge is properly secured and maintains the instrument’s integrity.
Another important cue is if there is visible damage or cracking around the bridge area. In such cases, the use of a bridge clamp, combined with precise gluing techniques, can reinforce the structure and prevent further damage.
From personal experience, catching these issues early means a simple clamp procedure can often overcome what might otherwise become a costly repair job. It’s all about knowing when to intervene and how. Thus, mastering the use of a guitar bridge clamp not only saves your beloved instrument but also enriches your journey as a guitarist.
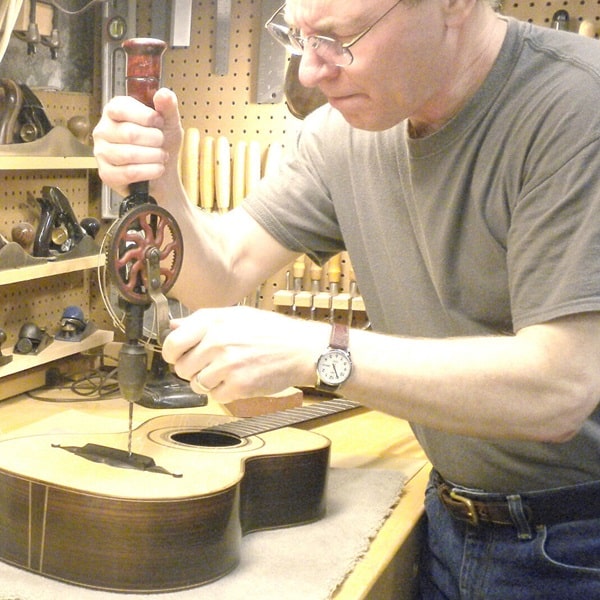
How to Use a Guitar Bridge Clamp
Gathering Your Materials
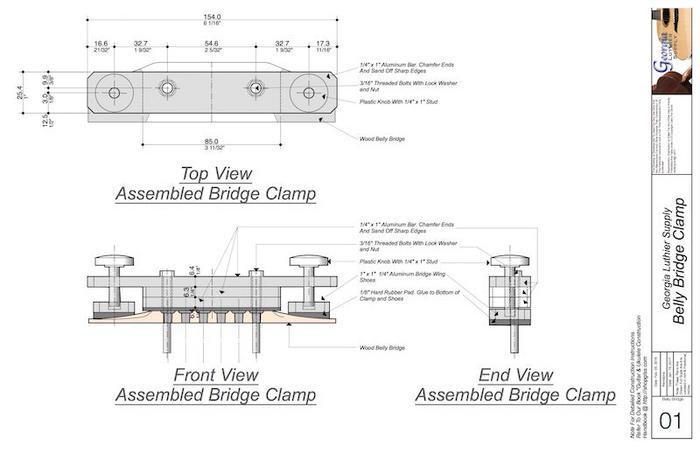
Before diving into the intricate world of using a guitar bridge clamp, it’s essential to gather the right materials—a step often overlooked but crucial to the ultimate success of your repair. Why is the quality of your materials just as important as the clamp itself? As someone who has meticulously studied materials used in lutherie, I understand that the right supplies can significantly influence the quality of repairs. Imagine trying to bake a gourmet cake with subpar ingredients; the outcome would be less than satisfactory. The same principle applies here. Armed with high-quality luthier tools and guitar luthier supplies, you’re laying a solid foundation for your repair journey.
Each component, from adhesives to soft-fiber cloths, plays a pivotal role in ensuring that your bridge clamp functions optimally. This selection process is not mere preparation; it’s the cornerstone of repair. Having the correct materials close at hand enhances both precision and ease, preventing frustrating mid-repair scavenges for missing items. With your materials gathered, you’ll be ready to move on to the next vital step: applying the glue correctly, securing the groundwork for a flawless repair.
Applying the Glue Correctly
Could the wrong glue application be the silent killer of your guitar’s performance? Through years of exploring guitar repair techniques, I’ve learned that mastering the **gluing guitar bridge** process is crucial. Knowing the nuances of glue application has been a significant focus of my research, and I’ve developed effective techniques to share.
Applying glue correctly ensures that your guitar bridge stays securely in place, maintaining the integrity of your instrument’s sound. First, ensure the surfaces of both the bridge and the guitar body are clean and dry for a strong bond. Choose the right glue—typically **wood glue**—for its penetrating and binding capabilities. It’s vital to *apply a uniform, thin layer* on both surfaces. Too much glue can lead to a weak bond and affect your guitar’s resonance negatively.
Once applied, carefully align the bridge to the body. Uneven or excessive glue application can compromise the *natural sound* of the guitar, often unnoticed until it’s too late. By maintaining the right techniques, you allow your guitar bridge clamp to perform its task optimally when it’s time to secure the clamp. This synergy between glue and clamp prolongs the effective life of your repair.
Next, we will delve into how to properly secure the clamp, ensuring your hard work during the gluing phase renders professional-grade results. By mastering these aspects, you’ll not only enhance your guitar’s longevity but also keep its sound at peak performance.
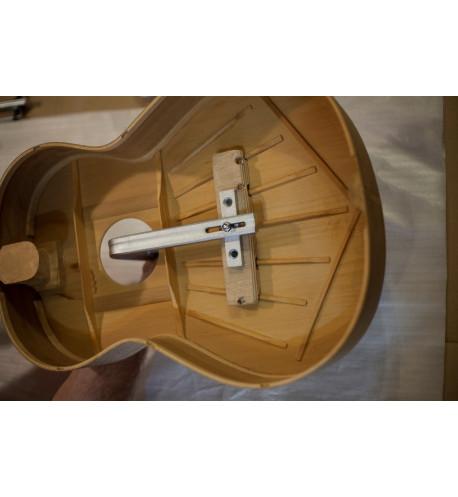
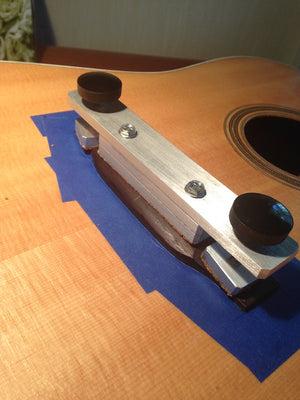
Securing the Clamp
Securing the clamp is the heart of using a guitar bridge clamp effectively. What could you be risking if your clamp isn’t secured properly? A loose clamp can lead to misaligned bridges, causing sound quality issues or even instrument damage. Having engaged in hundreds of instrument repairs, I’ve learned that *attention to detail during clamping* can prevent costly mistakes.
When working on bridge adjustments, using the right clamping tools is crucial. Start by ensuring the bridge is accurately positioned on the guitar body. Carefully place the clamp, making sure it’s snug but not overly tight, as excessive pressure can harm the instrument’s finish. The key is finding the balance where the clamp holds the bridge securely without distorting its position.
This step is not just about attaching the clamp; it’s about aligning precision with care. A firm grip ensures stability and the proper setting of adhesives, leading seamlessly to the next phase of your guitar clamping journey.
Tips for Effective Guitar Bridge Clamping
What insider tips could elevate your guitar repair skills to the next level? As someone who has contributed to various lutherie journals, I’ve gathered numerous best practices that can empower both novice and seasoned luthiers alike. When it comes to effective guitar bridge clamping, one of the most vital steps is ensuring the perfect alignment and pressure distribution. Let me share a few insights learned through experience.
First, careful selection of the types of guitar clamps is essential. Different guitars require different clamps to accommodate their unique shapes and sizes. I always recommend having a variety of clamps on hand to cater to diverse bridge adjustments, thus ensuring precision in your work.
Additionally, never underestimate the importance of guitar maintenance. Preparing the surface meticulously before applying a clamp enhances adhesion and results in a more resilient repair job. A common mistake is overlooking wood swelling; anticipate this by using proper techniques to manage moisture levels before clamping down.
Moreover, mastering the art of distributing even pressure is crucial. Uneven pressure can lead to warped bridges or inadequate sound transmission. Therefore, it’s worth investing in high-quality clamps with precise tension controls, enabling you to fine-tune the adjustments with accuracy and confidence.
These strategic tips, rooted in practical experience, will undoubtedly refine your clamping technique, propelling your guitar repair craftsmanship to higher levels. Whether you’re a newcomer or a seasoned luthier, embracing these practices will enhance your expertise and outcomes. Let’s harness the art and science of bridge clamping together, making every repair a success story.
FAQs
What is a guitar bridge clamp?
How do you use a guitar bridge clamp?
What techniques improve the effectiveness of using a guitar bridge clamp?
Where can you buy a guitar bridge clamp?
Conclusion
What lasting impact can mastering the use of a guitar bridge clamp have on your instrument’s performance? As I reflect on my journey, it’s clear that understanding and applying proper techniques can not only extend the life of a guitar but also enhance its joy of play. Through effective guitar maintenance, these tools become invaluable assets, ensuring your instrument consistently delivers beautiful sound.
Diving into the world of bridge clamps has enlightened me on their pivotal role. From knowing precisely when to use a guitar bridge clamp to mastering how to secure it effectively, these skills contribute significantly to preserving and elevating an instrument’s quality. Whether sourced from trusted suppliers or local stores, the right clamp and method can transform your guitar experience.
In wrapping up, I hope this guide has equipped you with the insights necessary for successful guitar maintenance. Embrace these techniques to not only protect but also unlock your guitar’s fullest potential, making each session a harmonious delight.
R.M. Mottola, an engineer-turned-luthier, revolutionizes stringed instrument design with his deep focus on acoustics and ergonomics since 1994. As editor of the Savart Journal and a key contributor to American Lutherie, Mottola merges science with artistry in lutherie. He enriches the field with his extensive knowledge, shared through his Liutaio Mottola website, making him a beacon in the world of modern instrument craftsmanship.